Pull Up Bar with Dips: Buyer Guide for Home Safety
 16 min
Choose a station rated for at least 1.5 times your bodyweight plus any added load. Only use it after a 120% bodyweight load test and verified 6–8 inches of foot clearance.
That sounds more like an installation rule than a fitness tip because it is one. A pull up bar with dips can look harmless in an apartment corner, especially when the product photo shows a calm, motionless athlete. In use, the frame deals with changing direction at the bottom of a dip, slight swinging during a pull-up, shifting grip positions, and repeated loading on the same joints and fasteners.
The category has also moved well beyond the basic doorway bar. One U.S. market analysis estimates annual pull-up bar sales at about 3.5–5 million units by 2025, with average selling prices around $45–$65, while freestanding pull-up and dip stations are identified as the fastest-growing sub-segment, projected to expand by 7%–9% annually as buyers seek more function in less space (U.S. pull-up bar market analysis). More options don't make the buying decision easier. They make it more important to match the station to your wall, ceiling, floor, bodyweight, and training style.
Table of Contents
- The Question to Ask Before You Buy
- How Pull-Ups and Dips Stress Your Shoulders Differently
- Frame Rating and Construction Quality to Check
- Doorframe, Wall-Mounted, and Freestanding Options Compared
- Room Measurements and Clearance Before Installation
- Training Smart with Short Shared Sets
- Common Buying Myths and Safer Alternatives
- Final Buyer Checklist and Safe First Use Routine
The Question to Ask Before You Buy
An apartment buyer often starts with the wrong question: “Which pull up bar with dips is best?” The practical question is whether the station will remain stable in your room through repeated use.
A doorway can look suitable until shallow trim, flexible drywall, a low ceiling, or furniture below the bar changes the risk. A freestanding tower avoids drilling, yet a narrow base, uneven floor, or dip handles that sit too high can still make it rock. A wall-mounted station saves floor space, but its fasteners must transfer force into suitable structure rather than weak wall material.
Practical rule: Treat the station as a structural installation before treating it as workout equipment.
Start with the load path. Identify whether force travels into the floor, wall, or doorframe, then check the published rating, movement area, and hardware. The rating should cover at least 1.5 times your bodyweight plus added load, not only your static bodyweight. Before full repetitions, load the assembled unit to 120% of your bodyweight and confirm at least 6–8 inches of clearance beneath the bar, following this installation and clearance guidance.
Short training sessions do not reduce installation risk. A bodyweight workout at home is convenient only when the fixture stays predictable under load. Test the station with controlled pressure before adding swinging, fast transitions, or weighted work. If the bar flexes, the wall creaks, or the base shifts, stop. Fix the hardware, anchoring, floor contact, or room setup before training on it. A clean product photo cannot verify any of those conditions.
How Pull-Ups and Dips Stress Your Shoulders Differently
A pull-up and a dip may share one station, but they don't ask the shoulder to do the same job. Pull-ups are traction-dominant, with the arms overhead and the body suspended from the hands. Dips load the shoulder in extension and compression, particularly as the upper arm travels behind the torso near the bottom position.
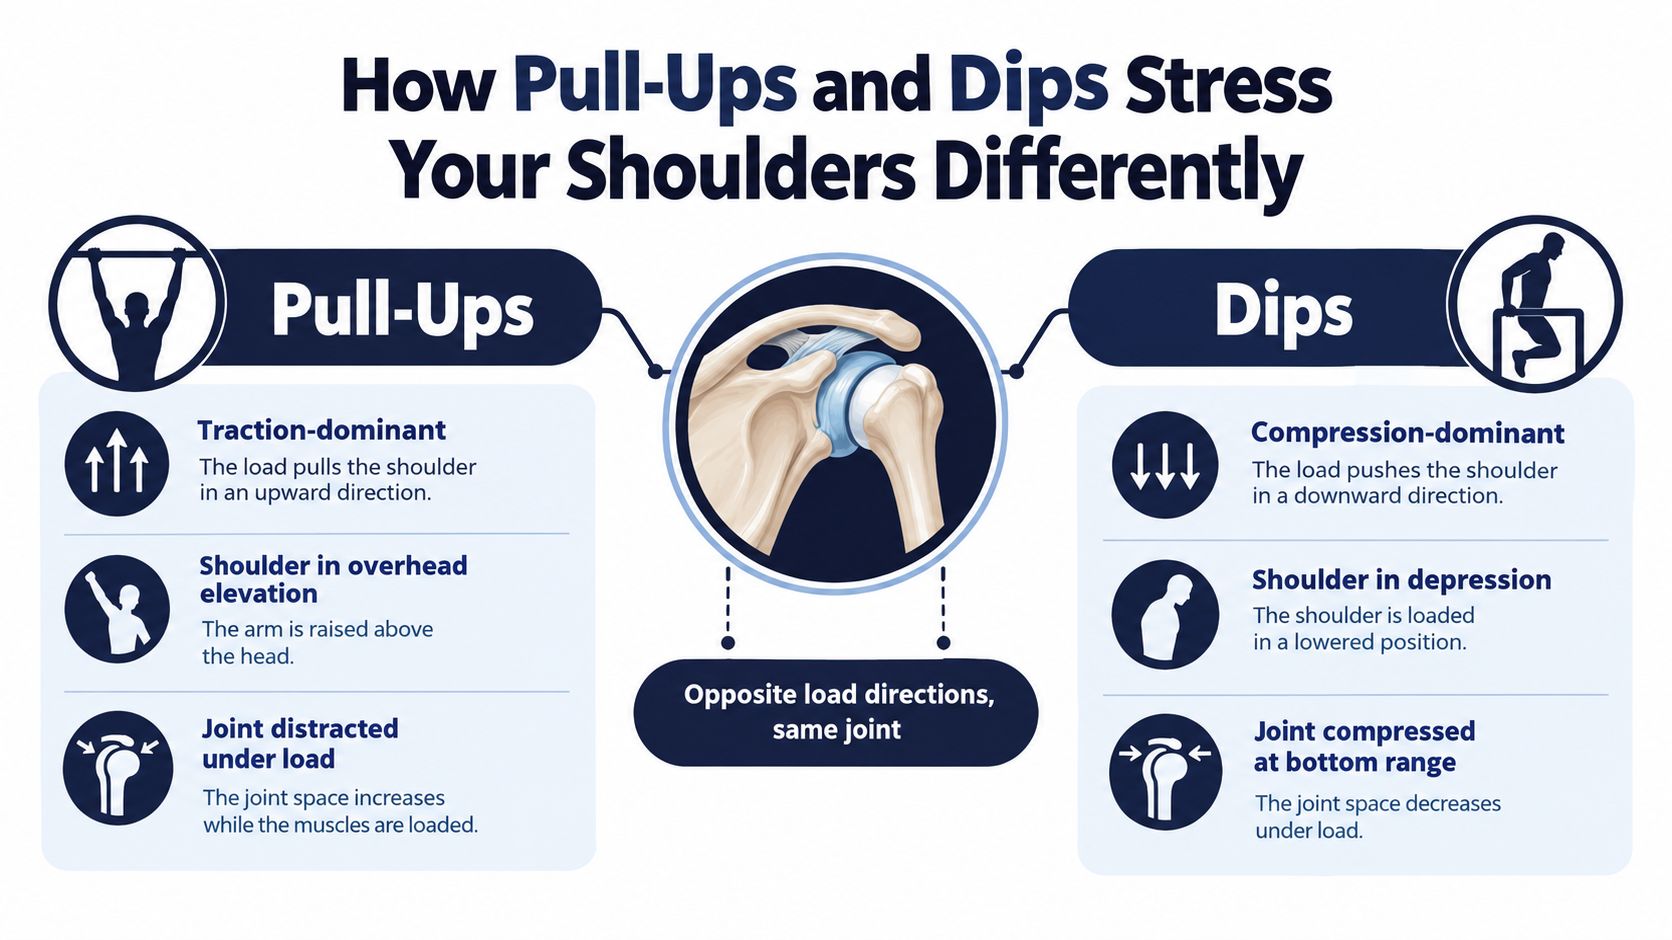
Pull-up mechanics deserve attention because high arm elevation can reduce sub-acromial space and increase pressure when overhead movement is poorly controlled, as reported in a peer-reviewed scapular kinematics study summarized in this dip and pull-up form guide. A station with several grip positions can help you find a comfortable path, but it can't correct shrugged shoulders, uncontrolled swinging, or a grip that forces your elbows into an awkward angle.
Use an active shoulder position rather than hanging passively through the joint. Keep the ribs controlled, avoid chasing range that causes pinching, and reduce the repetition range if you can't maintain a steady torso. A neutral or semi-neutral grip may feel more natural for some users, while a fixed wide grip may expose others to a range they can't control.
Dips need their own guardrails:
- Lower with control: Keep the shoulder blades retracted and depressed through the eccentric phase rather than letting the shoulders rise toward the ears.
- Stop before pain: Don't force the deepest possible position. The bottom range should remain within a pain-free shoulder path.
- Track the elbows back: Excessive flaring can make the movement feel unstable and increase stress at the front of the shoulder.
- Match the handles to your frame: Handles that are too wide, too narrow, or too high can make a technically sound dip feel unnatural.
The up-and-over exercise also illustrates why pulling and pressing skills should be developed together rather than treated as interchangeable. Start with partial-range, controlled reps when you first use a new station. Your joints need to adapt to that specific handle width and body position.
Frame Rating and Construction Quality to Check
A load rating is useful only when you understand what it includes. “Heavy-duty” and “professional grade” describe marketing intent, not a measurable safety margin. Look for a published static rating, then compare it with your bodyweight and the additional plates, vest, or belt you expect to use.
A practical structural benchmark is 1.5 times the athlete's bodyweight plus added load because direction changes create dynamic force spikes. For example, a 200-pound athlete adding 100 pounds should select equipment rated for at least 450 pounds, according to the loading guidance in this dip bar equipment guide. The same guide notes that common commercial and home units often fall within the 400–600 pound range, while premium models can exceed 800 pounds. For a home buyer, a published static rating around 500 pounds or higher is a conservative threshold for bodyweight work and modest weighted progressions.
Read the frame, not the slogan
Inspect the load path from the handles to the base or mounting points. A thick-looking upright doesn't tell you how the joints behave where the dip handles attach, or whether the base spreads force effectively when your body moves forward.
Check these details before you buy:
- Weld quality: Look for continuous, even welds at the handle brackets, uprights, and base joints. Cracks, visible gaps, or rough interruptions deserve caution.
- Tube construction: Product pages should identify meaningful frame dimensions or construction details rather than relying only on “solid steel” language.
- Fastener hardware: Confirm that bolts, washers, and locking hardware are included where the design requires them.
- Grip security: Foam can improve comfort, but it shouldn't rotate or slide. A rotating handle changes your wrist and shoulder position mid-rep.
- Base contact: Rubber feet should sit flat and remain planted. Padding that compresses unevenly can create a rocking point.
Don't confuse mass with geometry. A heavy tower with poor bracing may wobble more than a lighter, well-designed structure. Stability comes from the complete load path, not from a large number printed on the box.
Doorframe, Wall-Mounted, and Freestanding Options Compared
The safest category depends less on the logo and more on the room and movement you plan to perform. A doorframe bar is quick and portable, but it transfers force into trim, contact surfaces, and the frame itself. A wall-mounted station removes floor clutter, yet it makes the wall and anchors part of the equipment. A freestanding power tower takes installation out of the equation, but it occupies more floor area and still needs a stable base.
Globally, the street workout equipment market was valued at $1.2 billion in 2025 and is projected to reach $2.3 billion by 2034, with pull-up bars representing $388.8 million and 32.4% share in 2025. Dip-capable parallel bars held 21.7% share, according to the street workout equipment market overview. Those figures show that combined pull-up and dip setups are established training equipment across homes, parks, schools, and commercial facilities, not a novelty accessory.
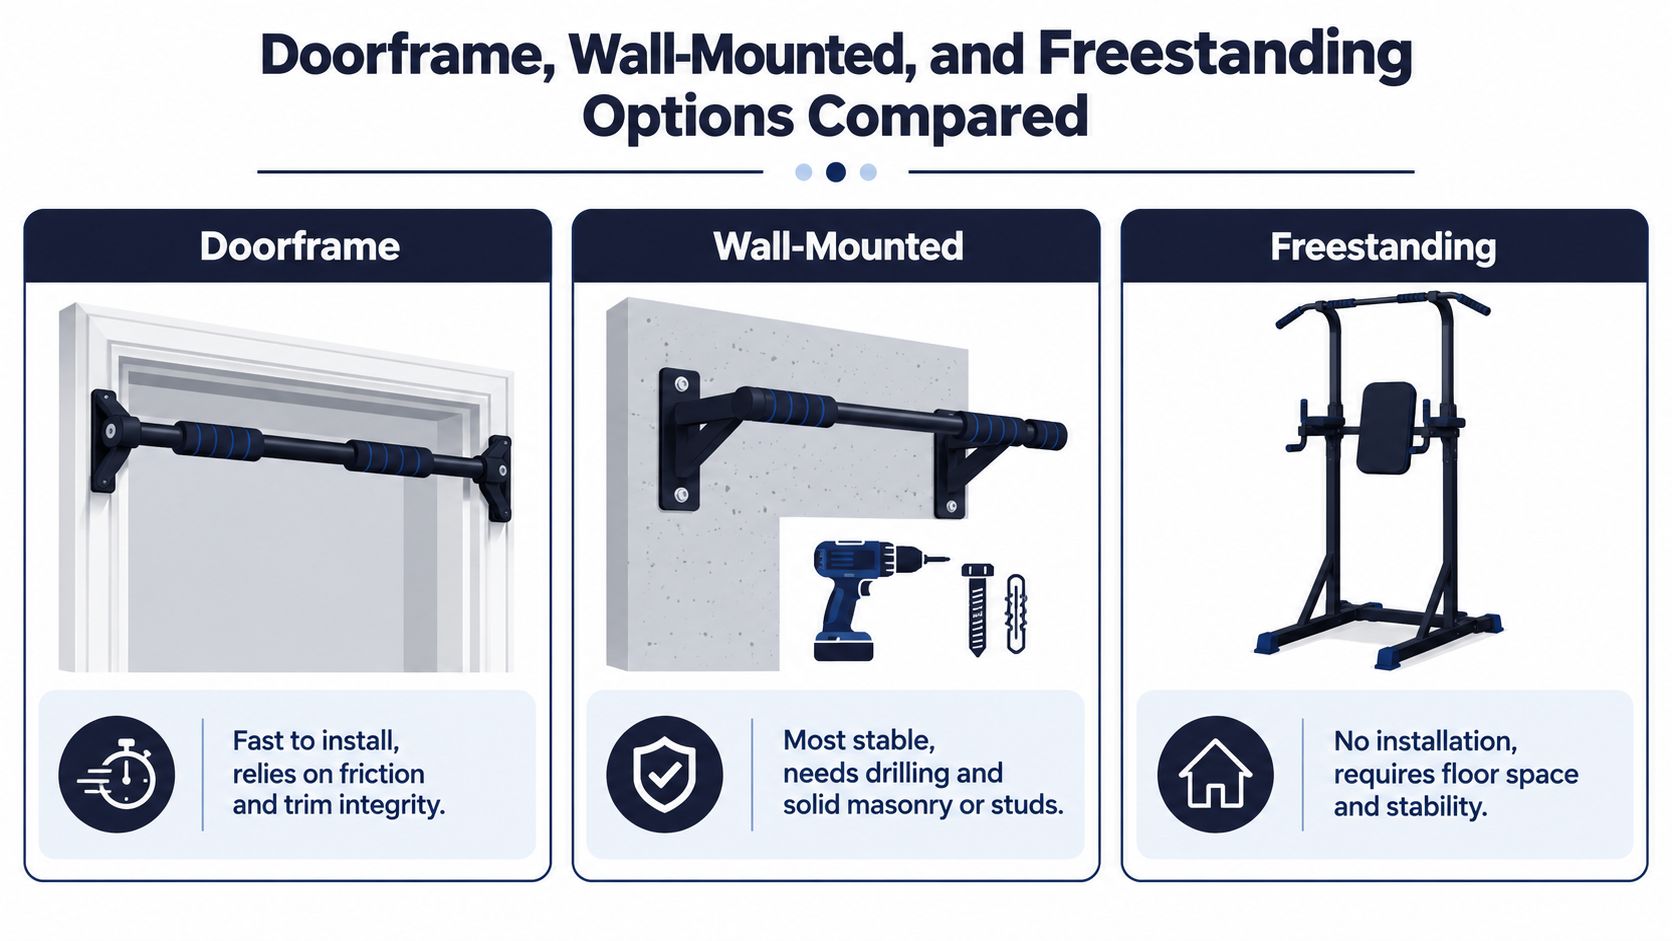
| Option | What works | What can fail | Best fit |
|---|---|---|---|
| Doorframe | Fast setup and easy storage | Friction, trim integrity, doorway dimensions, and incorrect installation | Light, controlled bodyweight work where the frame is verified |
| Wall-mounted | Small floor footprint and strong potential stability | Poor anchors, unsuitable wall material, and incorrect stud placement | A dedicated training wall with reliable structure |
| Freestanding | No drilling and a predictable standalone footprint | Floor space, rocking, narrow bases, and uneven surfaces | Serious home training where the room can accommodate the tower |
A freestanding unit may be the most sensible choice for weighted pull-ups or energetic transitions if you have enough room to brace it properly. A wall-mounted model can work well in a compact apartment when the mounting surface is suitable. Doorframe products should earn trust through a verified fit, not through convenience alone.
Room Measurements and Clearance Before Installation
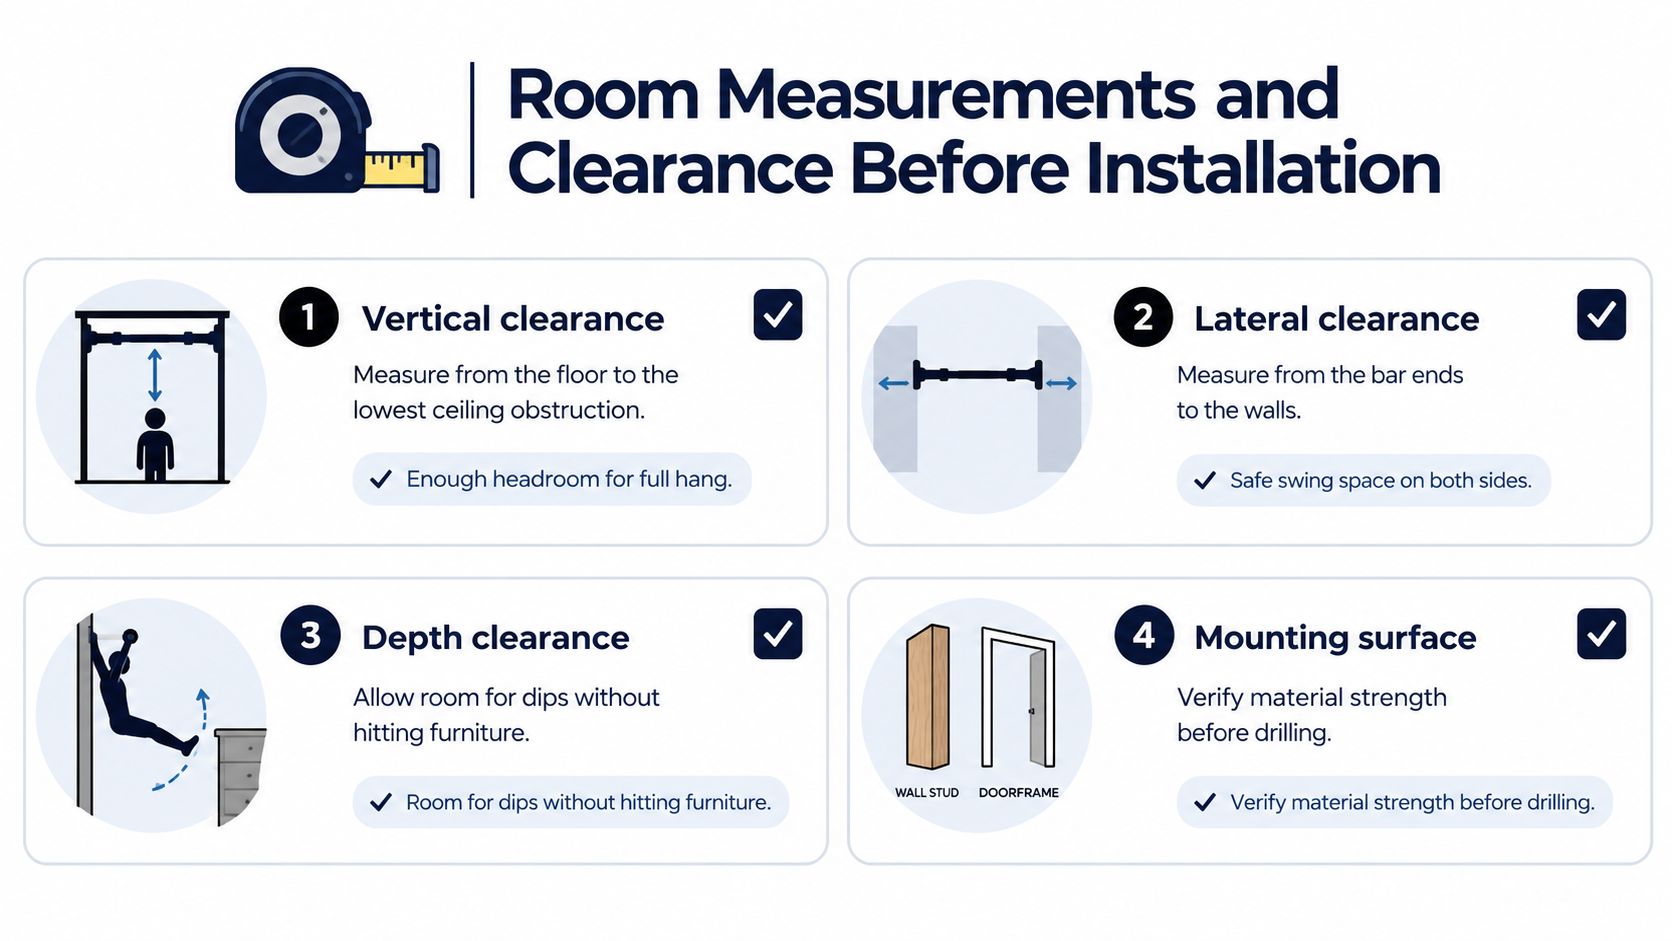
Measure the room before ordering a pull up bar with dips. The listed height and width describe the equipment, not the space your body occupies. You need room to hang, lower, move slightly, and complete dips without striking the ceiling, wall, shelves, doors, or furniture.
Check these four points:
- Vertical clearance: Measure from the floor to the lowest obstruction, including beams, light fixtures, and open doors. Allow for the station's height and your full hanging position.
- Lateral clearance: Measure from each bar end to nearby walls, shelves, and furniture. Your hands and elbows should have room to move through a normal repetition.
- Depth clearance: Stand where the pull-up bar and dip handles will sit. Check the space in front of and behind you. A sofa behind a freestanding tower cannot stop a fall safely.
- Mounting surface: Identify whether the installation uses drywall, plaster, concrete, or a wood-stud wall. A clean-looking surface does not confirm that it can support the intended load.
Foot clearance often gets overlooked because buyers focus on headroom. Installation guidance recommends at least 6–8 inches beneath the feet during pull-ups to reduce toe drag and unintended floor contact (home installation and clearance recommendations). Low ceilings may require bent-knee pull-ups, a lower mounting position, or a different station.
Use a controlled test sequence
Assemble the unit exactly as directed, tighten every fastener, and confirm that the bar is level. For a wall or doorframe installation, perform a practical 120% bodyweight test with controlled hangs before trying kipping, explosive negatives, or weighted work. Stop if anchors move, the frame flexes, fasteners creak, the unit slips, or wall contact changes.
Recheck bolts, padding, and mounting points at regular intervals. Repeated use can create play after an initially successful test, especially when multiple people train on the station.
Training Smart with Short Shared Sets
A pull up bar with dips earns its floor space when it supports repeatable training rather than occasional exhaustion. Short sets make it easier to preserve shoulder position, stop before technique degrades, and return to normal tasks without turning every session into a recovery problem.
Use a simple alternating rhythm. One training block can emphasize controlled pull-ups, another can emphasize dips, and a later block can use easier variations or scapular work. Keep at least one movement below your maximum effort so the next set begins with stable shoulders rather than fatigue-driven shrugging.
A useful micro-workout structure looks like this:
- Pull emphasis: Perform clean pull-up repetitions, stopping while you can still control the descent.
- Push emphasis: Use dips through a comfortable range, keeping the shoulders below the ears and the elbows tracking back.
- Low-load practice: Add scapular depressions, supported holds, or easier assisted variations when the main movement feels demanding.
- Recovery spacing: Separate harder pull and dip work with rest or lower-intensity activity instead of repeating maximal sets throughout the day.
Progress only when the same range and tempo remain controlled. Add a repetition, a small amount of external load, or a harder variation, but don't change all three at once. If your shoulders feel irritated, reduce depth and volume before deciding that the station or the exercise is unsuitable.
A bodyweight workout journal can help you record which variation you used, how the shoulder felt, and whether the station remained stable. The record doesn't need to be elaborate. The useful information is whether quality stays consistent across sessions.
For small groups, shared accountability can make short training blocks easier to maintain. Keep the social element secondary to the hardware check, however. No shared challenge is worth performing a repetition on a bar that shifts under load.
Common Buying Myths and Safer Alternatives
Myth one: a high repetition count proves the station is safe. It doesn't. Repetitions test your endurance, while safety depends on the frame, mounting points, load path, and the dynamic forces created as you reverse direction.
Safer alternative: Read the published static rating and compare it with the conservative loading benchmark described earlier. Then test the assembled unit with controlled hangs before introducing faster movements.
Myth two: every doorframe bar works in every doorway. Door trim varies in depth, strength, shape, and connection to the surrounding wall. A friction-based design can be convenient in one doorway and inappropriate in another.
Safer alternative: Check the manufacturer's fit requirements, inspect the trim and frame, and reject the installation if contact points are soft, damaged, loose, or visibly deforming. A quiet hang test should come before pull-ups.
Myth three: heavier always means safer. Extra material doesn't fix a poor base shape, weak weld, loose handle, or unsuitable floor. A tall tower with limited bracing can still move during dips.
Safer alternative: Judge the full geometry. Look for broad, stable contact, braced uprights, secure handle attachments, and feet that sit flat without rocking.
A quick troubleshooting filter
- If the bar slips: Stop using it and reassess the contact surface, torque, and installation instructions.
- If the frame creaks: Unload it, inspect welds and fasteners, and don't assume the sound is harmless.
- If the base rocks: Check the floor first, then examine the base geometry and fastener tension.
- If your shoulder pinches: Reduce range and adjust grip or elbow path. Don't force depth to match a product photograph.
The buyer's job isn't to find the most dramatic station. It's to find the one whose structure, dimensions, and installation match the intended training.
Final Buyer Checklist and Safe First Use Routine
A good purchase becomes a safe training tool only after it passes a final inspection. Do this before your first full workout, even if the product arrived assembled and the frame looks substantial.
Inspect the equipment
Check the bolts, washers, welds, padding, feet, and handle grips. Confirm that no fastener turns freely, no grip rotates unexpectedly, and no contact point has shifted. For a wall-mounted station, verify that the anchors are seated correctly in the intended structure. For a doorframe station, confirm that every contact point is aligned and fully engaged.
Apply the test load
Use the 120% bodyweight hang test for wall and doorframe installations before dynamic repetitions. Load the station gradually and stay alert for flex, creaking, slipping, anchor movement, or a change in the frame's position. If anything moves in a way the instructions don't describe, unload it and investigate rather than testing it with a faster movement.
Start with joint-friendly movement
Begin with light scapular depressions, supported holds, partial-range pull-ups, and partial-range dips. Keep the shoulders controlled, use a pain-free range, and stop well before fatigue changes your mechanics. The first session should establish comfort and stability, not prove strength.
Progress one variable at a time
Once the station remains stable and your joints tolerate the movement, progress gradually. You might increase range before adding load, or improve control before adding repetitions. Log the variation, range, and any equipment movement so your next decision is based on observation rather than confidence.
Safe first-use sequence: inspect, load-test, perform partial-range control work, then progress only after the frame and your shoulders both pass.
A pull up bar with dips can become the center of a compact home gym, but only when the station fits the room and the training matches its construction. Choose structure over slogans, clearance over convenience, and controlled repetitions over forced range.
SuperStrong offers pull-up bars for power racks and gym rigs, rack-mounted dip bars, and a squat rack with integrated pull-up and dip features, alongside short bodyweight training sets for at-home routines. If you want equipment options that connect with a simple shared training habit, visit SuperStrong and review the setup that fits your space.