How to Do Plank Shoulder Touches with Control
 12 min
You've cleared a patch of floor beside the bed, planted your hands, and started reaching for opposite shoulders. The taps look simple, but your hips swivel with every lift. Before long, you're moving quickly just to avoid feeling stuck on the supporting arm.
Plank shoulder touches are an anti-rotation skill, not a race. The useful challenge is moving your hand while keeping the rest of your body comparatively quiet. A manageable variation and a clear stopping rule matter more than a large rep count.
Table of Contents
- Why Plank Shoulder Touches Feel Tricky
- Set Up a Stable High Plank
- Perform Each Shoulder Touch Slowly
- Keep the Trunk Quiet and Braced
- Choose an Easier Variation When Needed
- Fix Common Form Errors Fast
- Build a Repeatable Quality Set
Why Plank Shoulder Touches Feel Tricky
A shoulder touch asks you to do something a regular plank doesn't: briefly trust the supporting arm while the other hand leaves the floor. If you rush that transfer, you may turn your chest and pelvis to make the reach easier. You finish the touch, but you've changed the task.
Think of the spare-room version: your feet are squeezed together beside the bed, you reach quickly, and your belt line turns toward the wall. That isn't a reason to push harder. It's a reason to change the setup.
The reach isn't the main challenge
You have separate jobs to manage: accept weight through the supporting arm, then replace the moving hand before switching sides. Thinking "touch the opposite shoulder" leaves out the part that requires control.
This visual breaks down the competing demands.
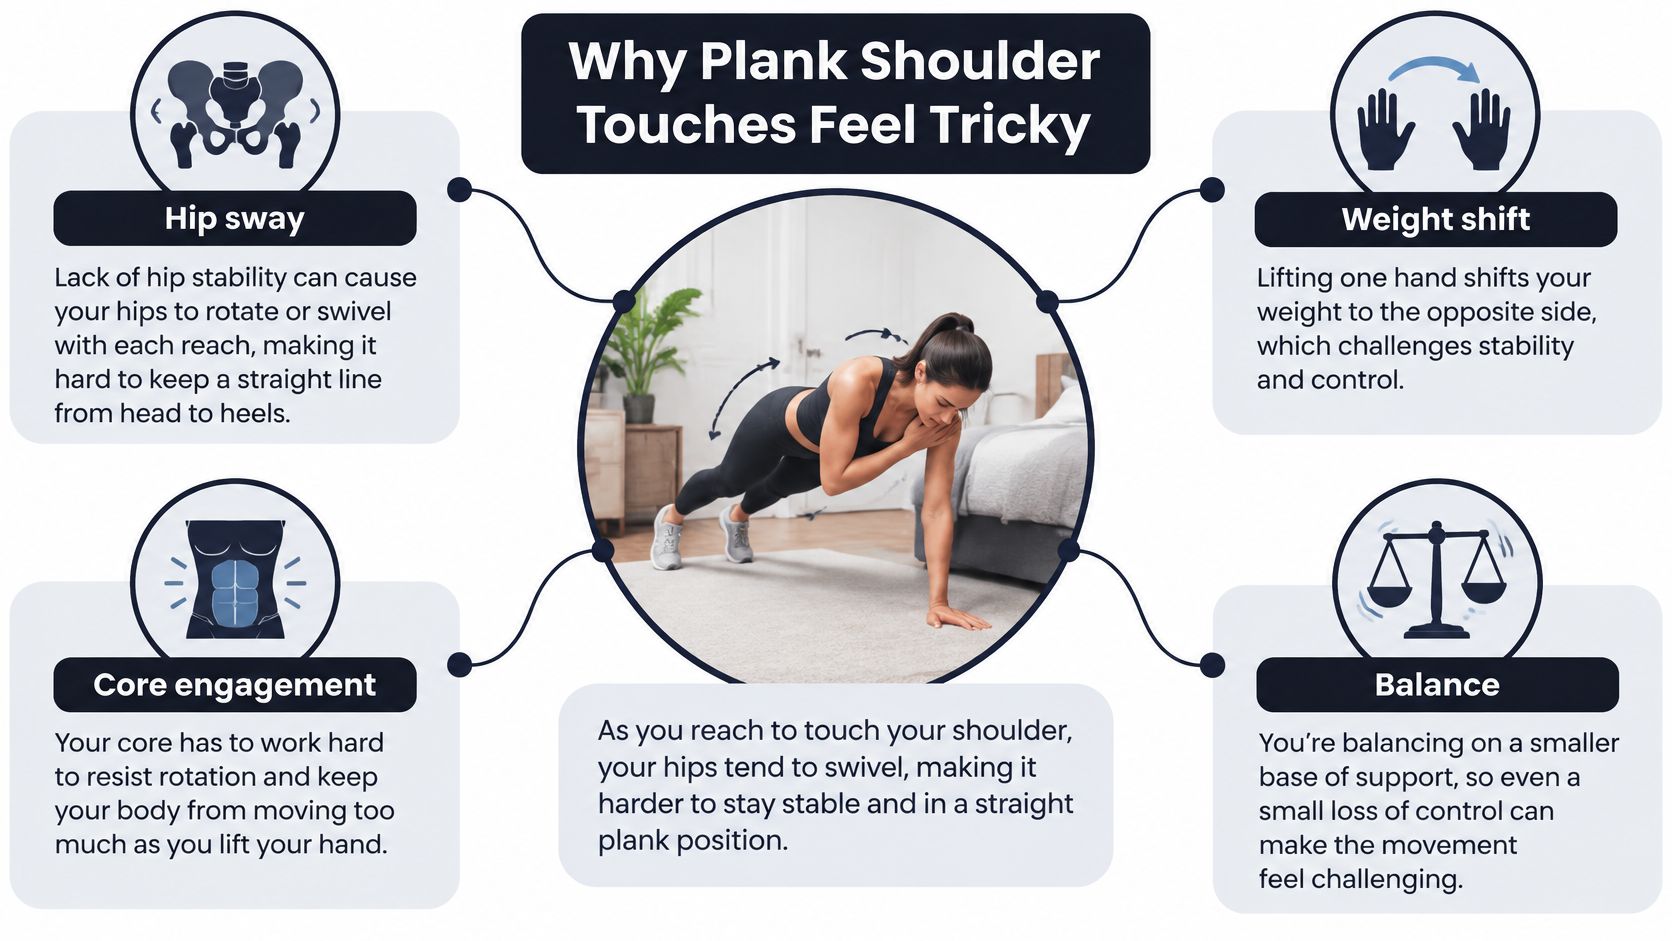
A smaller, deliberate reach is preferable to an exaggerated tap that pulls your whole body around. The same distinction is useful when exploring bear crawl exercises: moving a limb and controlling the supporting position are different skills.
Coaching standard: Make the hand movement obvious and the torso movement difficult to notice.
That standard gives you something practical to assess. Instead of asking whether you can keep going, ask whether the next touch will look like the last clean one. Setup, pacing, and exercise choice should all serve that answer.
Set Up a Stable High Plank
Build a position you can hold before asking it to move. If your lower back is already sagging or your shoulders are creeping toward your ears, adding taps won't fix the foundation.
Place your hands approximately beneath your shoulders. Give yourself enough room that furniture won't dictate an awkward stance or force your hand to land somewhere different after each reach.
Establish your starting position
- Set your hands. Spread them comfortably and establish steady contact with the surface. Don't begin with your hands far ahead of your shoulders.
- Give your feet room. Start slightly wider than hip-width rather than forcing a narrow stance.
- Align your body. Aim for a continuous head-to-heel line, with your pelvis neutral rather than tipped into a pronounced lower-back arch.
- Create tension without freezing. Brace your abdomen and contract your glutes while continuing to breathe. Keep your neck long rather than pulling your shoulders toward your ears.
Use the checklist below to rehearse the starting shape.
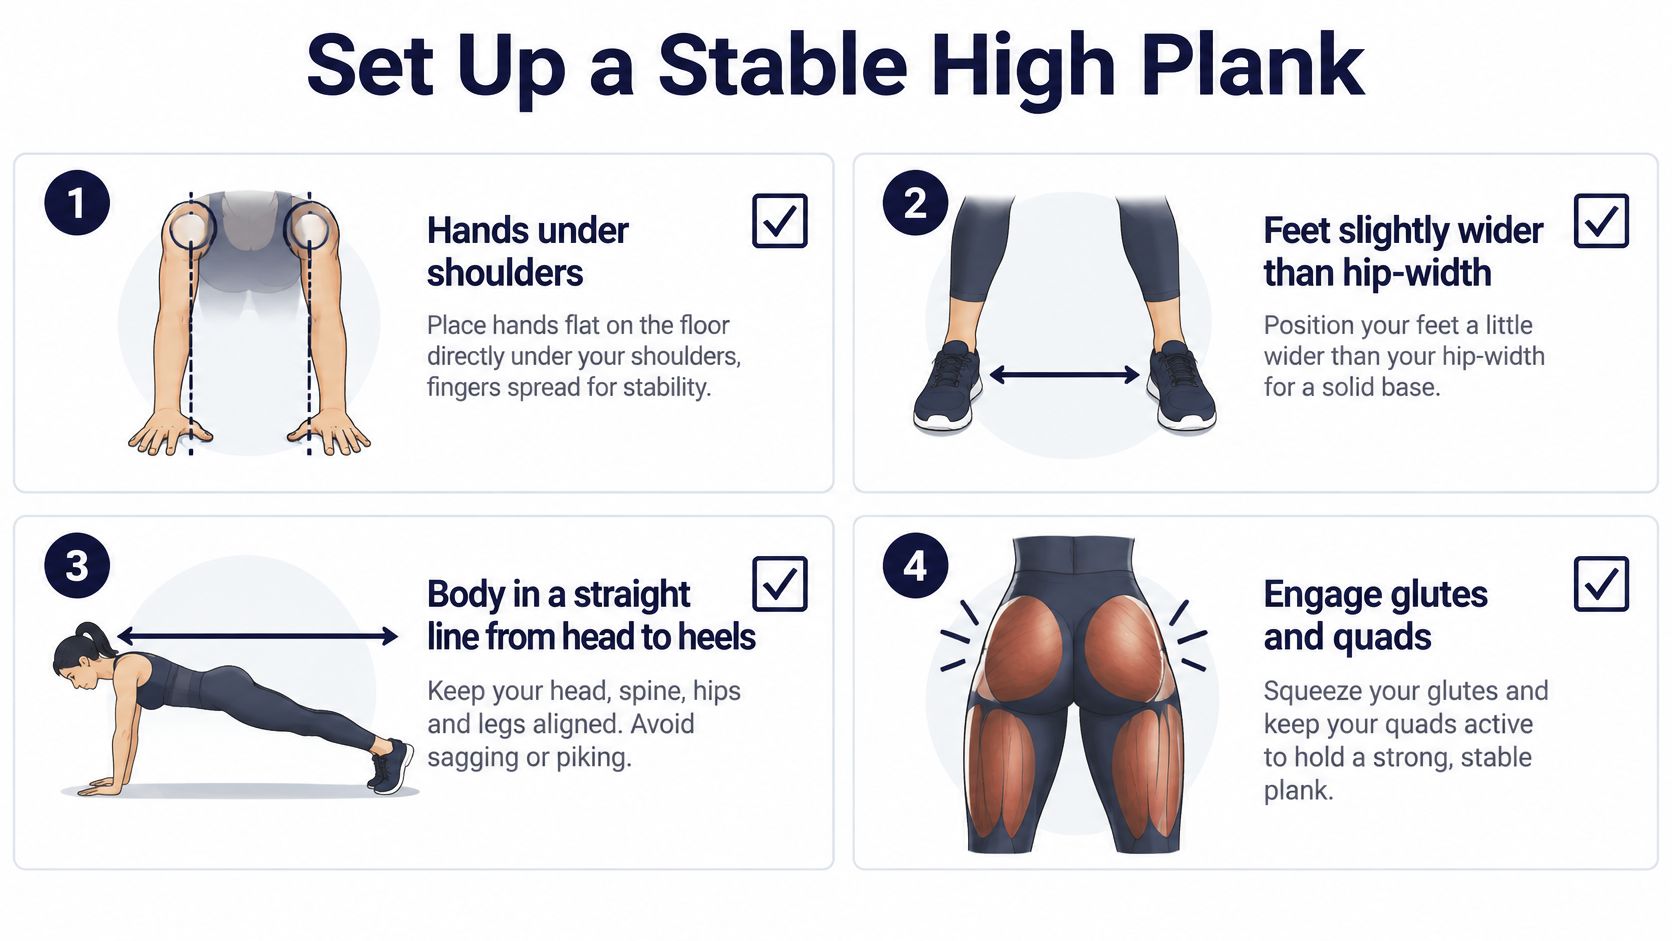
Before lifting a hand, notice whether you can breathe without your waist sinking. Your starting plank should feel deliberate, not like you're waiting for the first opportunity to escape it.
If you're already struggling, come out of the position and choose more support. Don't spend the beginning of every set repairing an unsuitable starting position.
A useful home-workout habit is to rebuild the same setup each time. Hand placement, foot spacing, and body alignment should be choices you repeat, not positions you happen to land in.
Perform Each Shoulder Touch Slowly
Begin with a deliberate transfer rather than a sudden lift. Let the supporting arm accept your weight, then move the free hand toward the opposite shoulder without dragging it along your torso.
Use the image to orient the reach, then pay attention to the return.
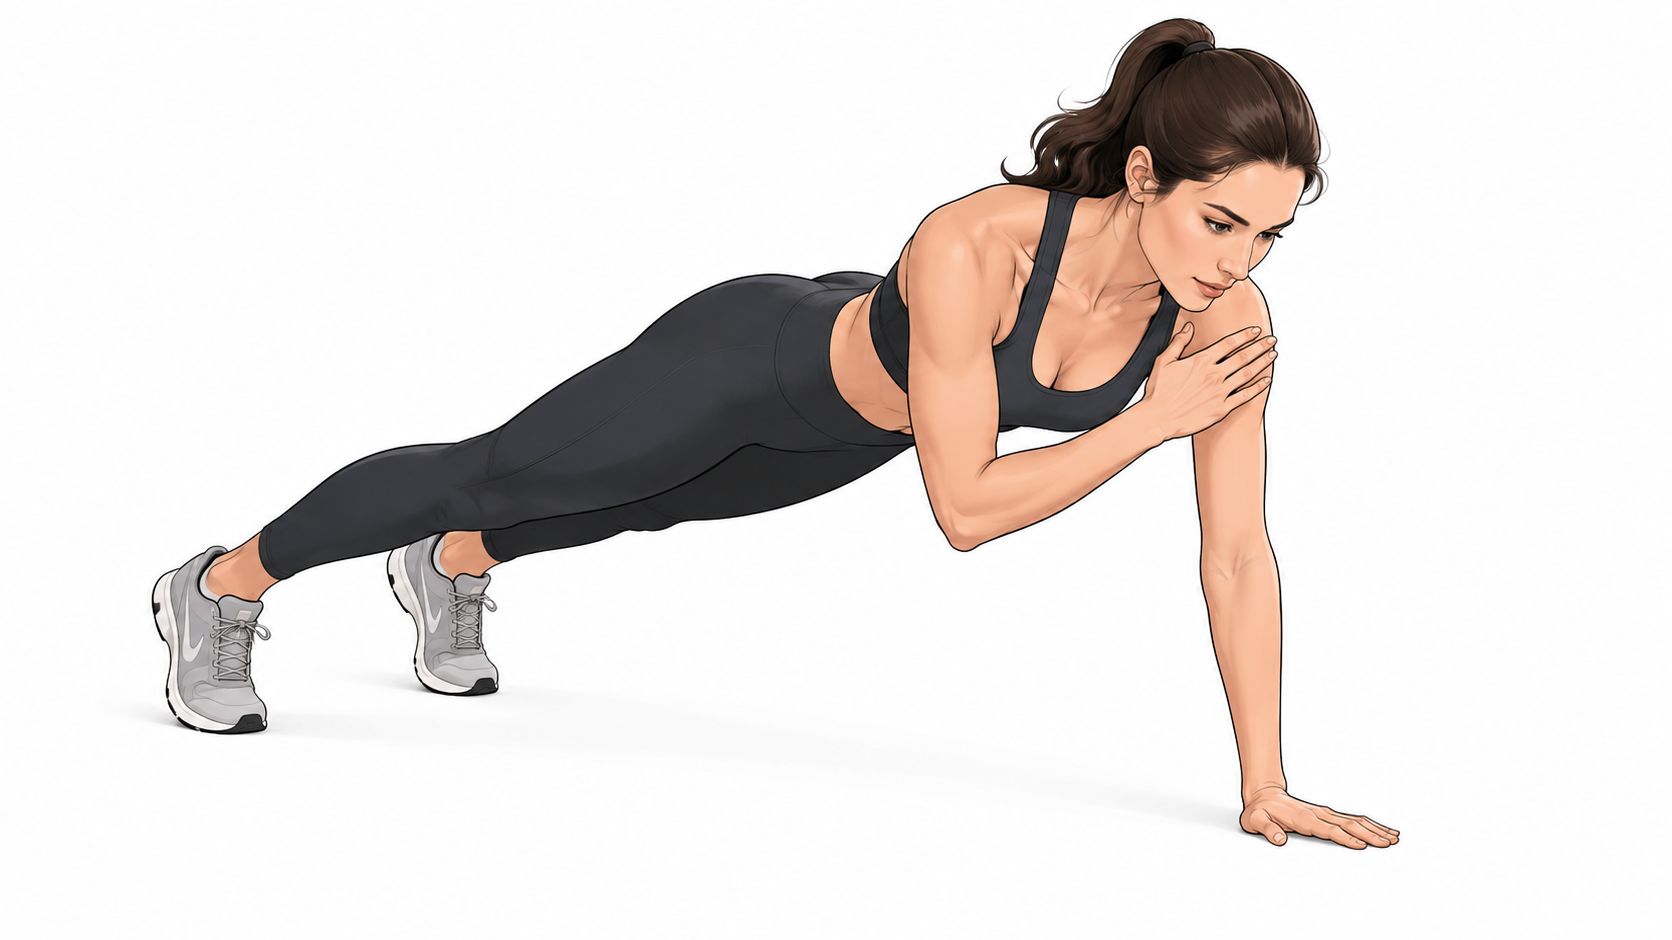
Each alternating hand lift changes a four-point support position into three-point support, creating a temporary anti-rotation challenge and increasing unilateral shoulder-stabilization demands, as described in the shoulder-tap plank research. That's why the transfer deserves as much attention as the shoulder contact.
Transfer, touch, and return
Reach toward the opposite shoulder and make brief contact. Don't lean your chest toward the approaching hand to manufacture the touch, and don't rest the hand against your body while you recover your balance.
Return the palm beneath its shoulder. Reestablish support before lifting the other hand, rather than swinging straight from side to side.
- Keep the destination clear. Touching the same-side shoulder changes the pattern. Reaching beyond the opposite shoulder adds unnecessary travel.
- Keep the reach honest. If contact requires a large twist, reduce the reach temporarily or choose an easier variation.
- Keep the transition visible. A brief pause after replacing the hand makes it easier to notice whether you've regained control.
Watch the full transfer-and-return sequence in the demonstration.
For logging, define a completed repetition as a controlled shoulder contact followed by the hand's return to its supporting position. An abbreviated practice reach can help you learn the transfer, but it shouldn't become a completed shoulder touch in your record without your noticing.
There's no benefit in making the movement look busier. The pause exposes whether you can support yourself between touches, which is precisely the skill fast alternating taps can conceal.
Keep the Trunk Quiet and Braced
A rising rep count can hide deteriorating technique. If each tap comes with a bigger hip turn, you're no longer repeating the same movement under the same conditions.
Quiet doesn't mean absolutely motionless. Some weight transfer is necessary. The practical distinction is between a small adjustment that lets you lift your hand and an obvious roll, drop, or arch that changes your plank position.
Watch the belt line and supporting shoulder
Use a phone recording if you can position it safely before starting. Look at your pelvis and supporting arm rather than watching only whether your hand reaches its target.
- Hip sway. Does your belt line visibly roll toward the lifted hand?
- Uneven pelvis. Does a hip hike upward or drop toward the floor?
- Lower-back position. Does your abdomen sink as your lumbar arch increases?
- Shoulder position. Does the supporting shoulder rise toward your ear?
- Hand return. Does the palm land progressively farther outside the shoulder line?
The visual below separates deliberate control from the common compensations.
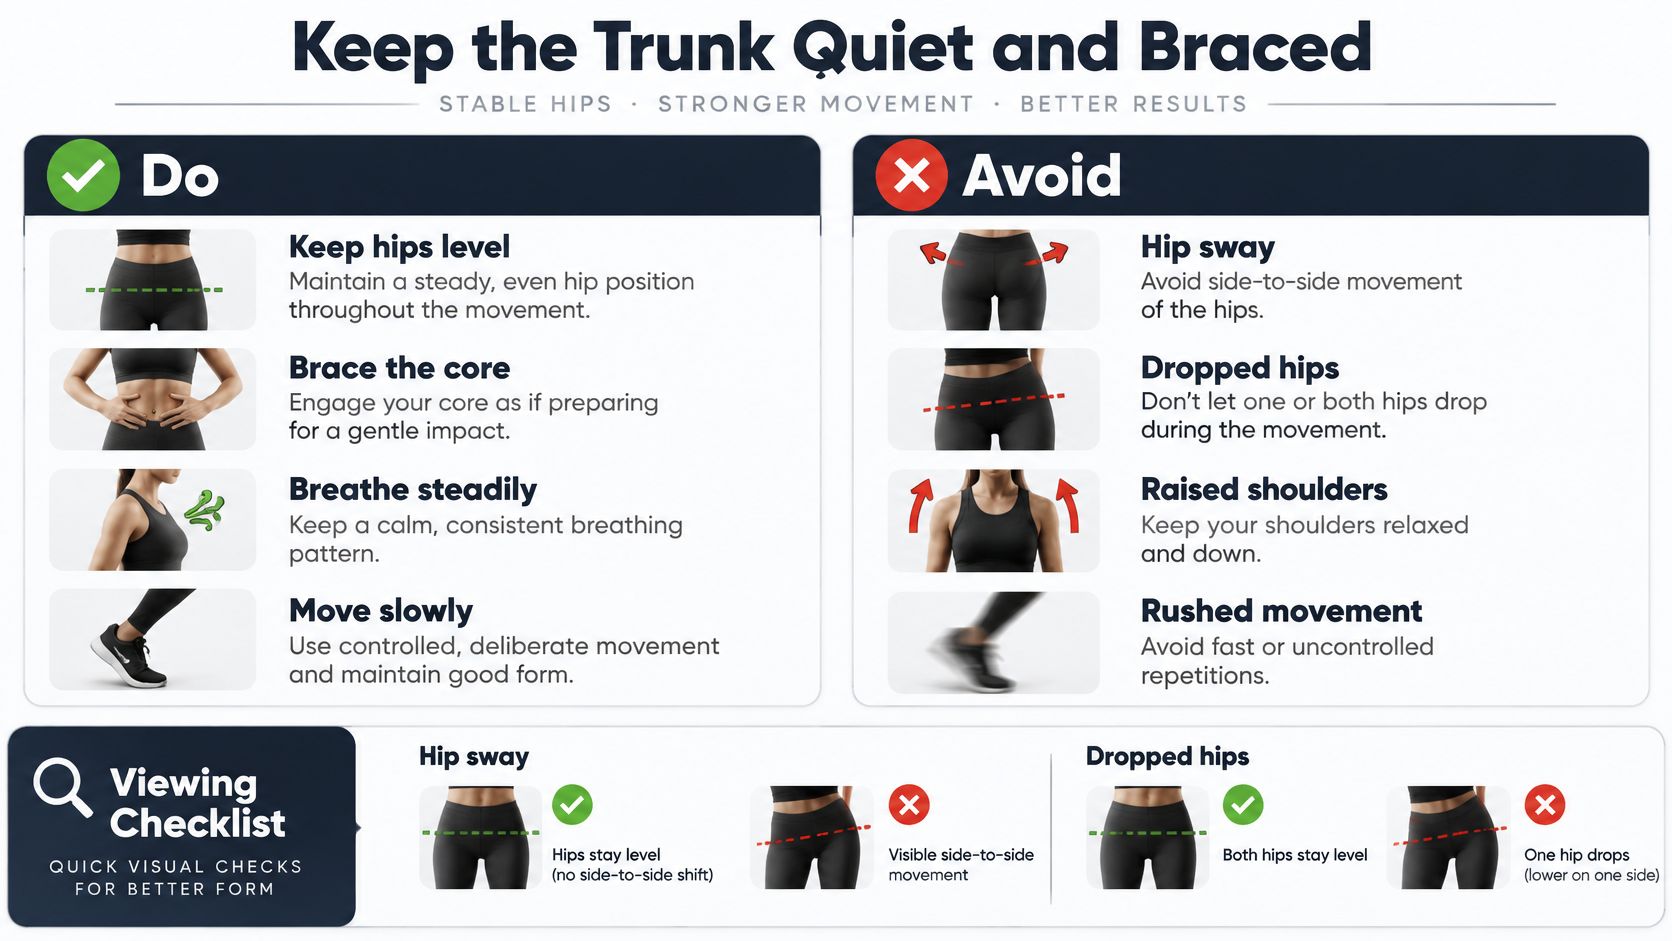
Keep pressure through both feet rather than rolling onto a foot's edge to help turn your pelvis. Brace to resist the rotation, but keep breathing.
End the set when visible trunk rotation, hip dropping, lumbar arching, shrugging, or misplaced hand returns recur despite your attempt to reset.
Make short sets honest
Between calls, you might clear a space, perform a brief set, and stop when the next transfer no longer looks controlled. Record only the clean touches, then rest before considering another set.
That's more useful than continuing until you can barely put your hand down. The same quality filter belongs in more demanding combinations such as renegade push-ups, where completing the arm action doesn't excuse losing the supporting position.
Short exercise bouts can be practical, but practicality isn't permission to choose maximal difficulty. The exercise-snack review discussed by the British Journal of Sports Medicine supports brief, distributed activity, not the idea that every set must become a test of survival.
Choose an Easier Variation When Needed
Choose the version that lets you practice the intended movement, not the version that looks most advanced. If a floor plank makes every touch a scramble, it's currently a poor learning environment.
The alternatives differ in body angle and support. They aren't a mandatory ladder that everyone must climb in the same order.
Plank shoulder touch support options
| Variation | Support Position | What It Helps Practice |
|---|---|---|
| Wall-supported | Hands against a wall, feet positioned for a manageable lean | Learning the transfer and opposite-shoulder reach without getting onto the floor |
| Elevated hands | Hands on a stable countertop or bench | Practicing the plank pattern with a more manageable loading position |
| Knees-down | Hands on the floor with knees supported | Rehearsing hand lifts with a shorter body lever |
| Standard floor | Hands and feet on the floor | Combining full-body plank control with alternating shoulder touches |
A countertop must be solid, and a bench must not slide or tip. Household furniture is useful only when it provides dependable support.
For some beginners, the raised version is easier to organize than knees-down taps. For others, kneeling feels more natural. Select by control and comfort rather than assuming either choice is automatically better.
Progress the support demand
A practical starting prescription is 2–3 sets of 6–10 controlled touches per side, with a slow transfer and brief pause; use that as a quality-limited coaching target alongside the plank experiment's repeatable 30-second test condition, not as a universal pass mark. Stop earlier whenever your form reaches the stopping rule.
- Adjust stance first. A wider foot position offers more stability; narrowing it increases the control challenge.
- Change deliberately. Increase the pause or reduce support, rather than altering everything together.
- Keep a consistent test. Compare sets performed with the same variation, stance, and pacing.
If you're rebuilding comfort moving into a plank, walk-out exercise practice offers a separate opportunity to work on that transition. Don't combine extra movements merely to make the shoulder touches feel harder.
Fix Common Form Errors Fast
Corrections should change what you see, not just how intensely you concentrate. “Tighten your core” is too vague if you don't also change the setup or end a fatigued set.
Match the correction to the fault
- Your hips roll. Shorten the reach, widen your feet, or raise your hands. Retry only when you can transfer weight without turning the pelvis to complete the tap.
- Your lower back arches. End the set and rebuild your brace. Trying to squeeze harder while continuing usually leaves you practicing the same compromised position.
- Your shoulders shrug. Check that your hands haven't drifted forward and that you aren't pulling your neck down between your shoulders. Return to a supported plank before another attempt.
- Your supporting arm gives way. Use an easier variation. A controlled pause is useful only when you can maintain the support position.
- Your returning hand lands wide. Reset beneath the shoulder and reduce the reach. Don't let each landing gradually reshape your plank.
Separate effort from warning signs
Muscular effort is different from sharp pain, joint pain, numbness, tingling, or symptoms that worsen during or after a set. Stop for those warning signs rather than trying to disguise them with faster reps.
For wrist discomfort, try a raised surface, a shorter set, and more rest. Hands may sit beneath or slightly outside the shoulders; fists or stable push-up handles are options only if that position feels comfortable.
Comfort check: A modification should make the movement more tolerable, not merely let you endure the same symptoms longer.
A static plank may be the better choice while you rebuild baseline control. The exercise-snack research in the Scandinavian Journal of Medicine & Science in Sports supports brief activity as a practical approach, but it doesn't establish shoulder touches as safe or optimal for everyone. Persistent or recurring symptoms deserve assessment by a qualified clinician.
Build a Repeatable Quality Set
Before a set between chores or calls, confirm your hands, stance, alignment, and brace. Transfer slowly, return each hand fully, and stop at recurring loss of position.
- Choose your logging unit. Use completed touches or right-left cycles, and keep the convention consistent.
- Record the conditions. Note the variation and whether you maintained control.
- Earn the progression. Change difficulty only when you can repeat clean sets.
Consistency means repeating useful practice, not reproducing your largest number at any cost. Choose a version you can control today and leave room to progress.
SuperStrong offers an iPhone app that organizes short at-home sets into a shared visual wall with friends, including movements such as push-ups, squats, glute bridges, rows, bird dogs, and dips. Bring the same quality-first standard to your workout logging: record completed, controlled work rather than chasing a larger tile. Visit SuperStrong to make manageable home workouts visible and share the effort with your group.