How to Do Push Ups Correctly for Beginners: Form First
 15 min
Most beginner advice tells you to chase a bigger number every day. That's backwards. If you're learning how to do push ups correctly for beginners, your first job isn't more reps, it's reps that count. A shallow rep with sagging hips teaches your body a shortcut, and you'll have to unlearn it later. Stopping early, while your form still holds, is better coaching than grinding through tired, distorted repetitions.
Table of Contents
- Five Checkpoints for Correct Push-Up Form
- Common Push-Up Mistakes and How to Fix Them
- Regressions for Beginners Who Cannot Hold Form Yet
- Choose Your Starting Variation Today
- Building a Daily Push-Up Routine from Micro-Sets
- Pain Signals That Mean Stop and Reassess
Five Checkpoints for Correct Push-Up Form
You're on rep eight, counting out loud, but your hips have dropped and your chest is nowhere near the floor. The number looks good. The movement doesn't. Run through these five checkpoints instead, in order, before you worry about totals.
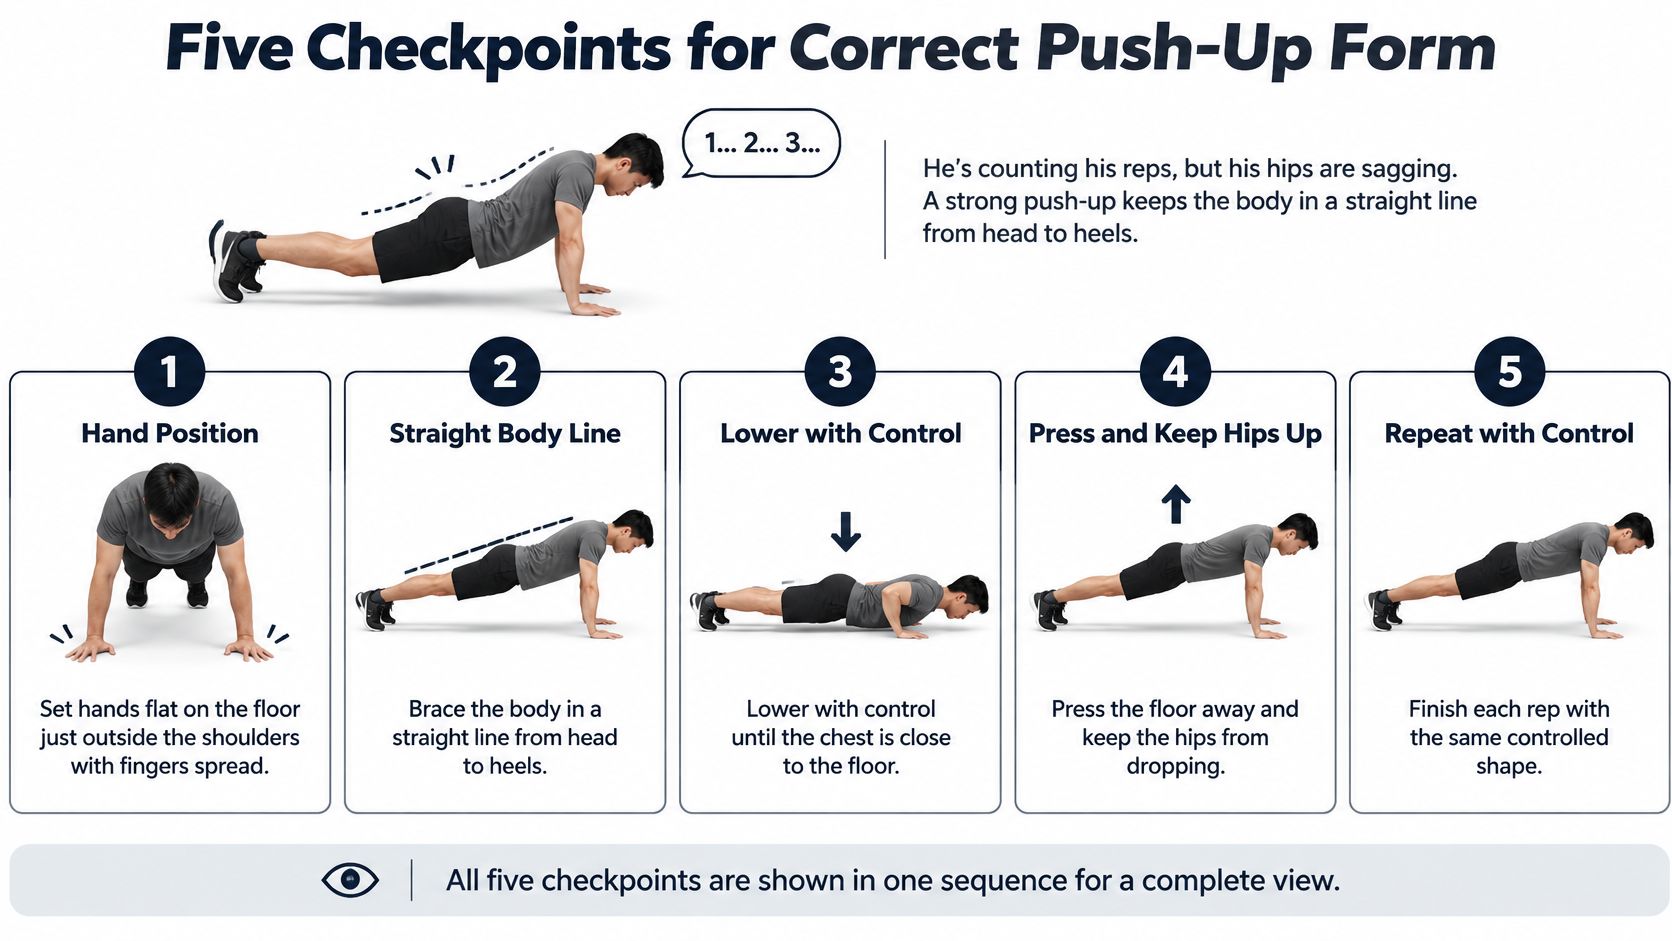
- Hands first. Set your hands flat, fingers spread, just outside your shoulders so each wrist sits under its shoulder. This stable base spreads pressure across your whole hand.
- One rigid line. Walk your feet back and together until your body is straight from shoulders to ankles. Brace your abdomen and squeeze your glutes hard before you move.
- Head neutral. Look at the floor a short distance ahead of your hands. Don't crane up to see a mirror, and don't tuck your chin to your chest.
- Lower as one unit. Bend your elbows so they track diagonally back toward your hips, not straight out. Lower over about two seconds until your upper arms are roughly parallel to the ground.
- Press and finish. Push the floor away over about one second until your elbows fully extend. Your hips rise at the same speed as your chest, never lagging or leading.
Why the Single Unit Rule Matters
That sequence matches the U.S. Army protocol described in Military Medicine, which starts in a front-leaning-rest position, lowers the body as one unit until the upper arms are at least parallel to the ground at approximately a 90-degree elbow angle, then raises the entire body until the arms are fully extended. Under that standard, a rep fails if your hips sag or rise, you don't reach depth, or you don't extend your elbows at the top.
Hold yourself to the same test at home. A rep counts only when alignment, depth, and lockout all happen together. If one of the three breaks, that rep isn't a full push-up, no matter what your counter says. This isn't pedantry. Depth and lockout keep every set comparable, so progress next week means something.
Self-check on video: Film one set from the side and ask three questions. Are my hips level with the line? Did my chest reach the same depth each time? Did my elbows lock at the top?
If you can't hold that line yet, you're not failing, you're just starting at the wrong difficulty. Our guide to the push-up position plank shows how to build the rigid starting position first, which makes every checkpoint above easier to keep.
Common Push-Up Mistakes and How to Fix Them
Film a set from the side and sagging hips is usually the first thing you'll spot. Your lower back dips, your belly reaches for the floor, and the rep becomes an upper body dip hanging off a soft middle. It happens because your chest and arms are working, but your abdomen and glutes have switched off.
| Mistake | What It Looks Like | Fix |
|---|---|---|
| Sagging hips | Lower back dips and hips drop toward the floor | Brace abdomen and glutes, squeeze to keep a straight line |
| Piking hips | Hips rise above the shoulder-to-ankle line | Lower the hips and shorten the range until the line holds |
| Elbow flare | Elbows point straight out to the sides | Angle elbows diagonally back, tucking them toward the torso |
| Shallow depth | Chest stops well above the floor | Lower to the deepest position that keeps the body straight and pain-free |
| Craned neck | Head lifts to look forward during the press | Keep the head neutral with eyes on the floor just ahead of the hands |
| Bouncing | Body rebounds off the bottom without control | Pause briefly at the bottom, then press up on a controlled count |
| Wrist pain at the top | Sharp or aching pain in the wrist under load | Use neutral-wrist handles or fists, or regress to a higher surface |
The Two Errors Worth Fixing First
Elbow flare deserves priority because it loads your shoulders badly. The Gymshark push-up technique guide advises keeping the elbows close enough to the torso to avoid a 90-degree flare, since excessive flaring can increase shoulder stress, while a very narrow hand position changes the exercise toward greater triceps demand. Think of your upper body as an arrowhead from above, not a T shape.
Wrist pain is the other early priority, and you shouldn't train through it repeatedly. An extended wrist redirects force toward wrist structures that are less suited to absorb it. Neutral-wrist handles or fists reduce that extension, but only use them on stable equipment that won't roll or tip. If your balance or hand position feels unreliable, drop the handles and raise your hands onto a bench instead.
Fix the error that appears first on your recorded set, not all seven at once. One correction per set is enough for your body to learn.
Don't try to overhaul everything in a single session. Watch your video, pick the earliest breakdown, and correct only that one next set. Then apply the logging rule. Count only reps that meet the same technical standard, because faulty reps inflate your volume and rehearse the exact movement you're trying to fix.
Regressions for Beginners Who Cannot Hold Form Yet
Forcing floor push-ups before you can hold the body line doesn't build toughness. It builds a sagging, shallow pattern you'll practice hundreds of times. A regression keeps the identical movement while reducing the load, so the skill you learn carries straight over.
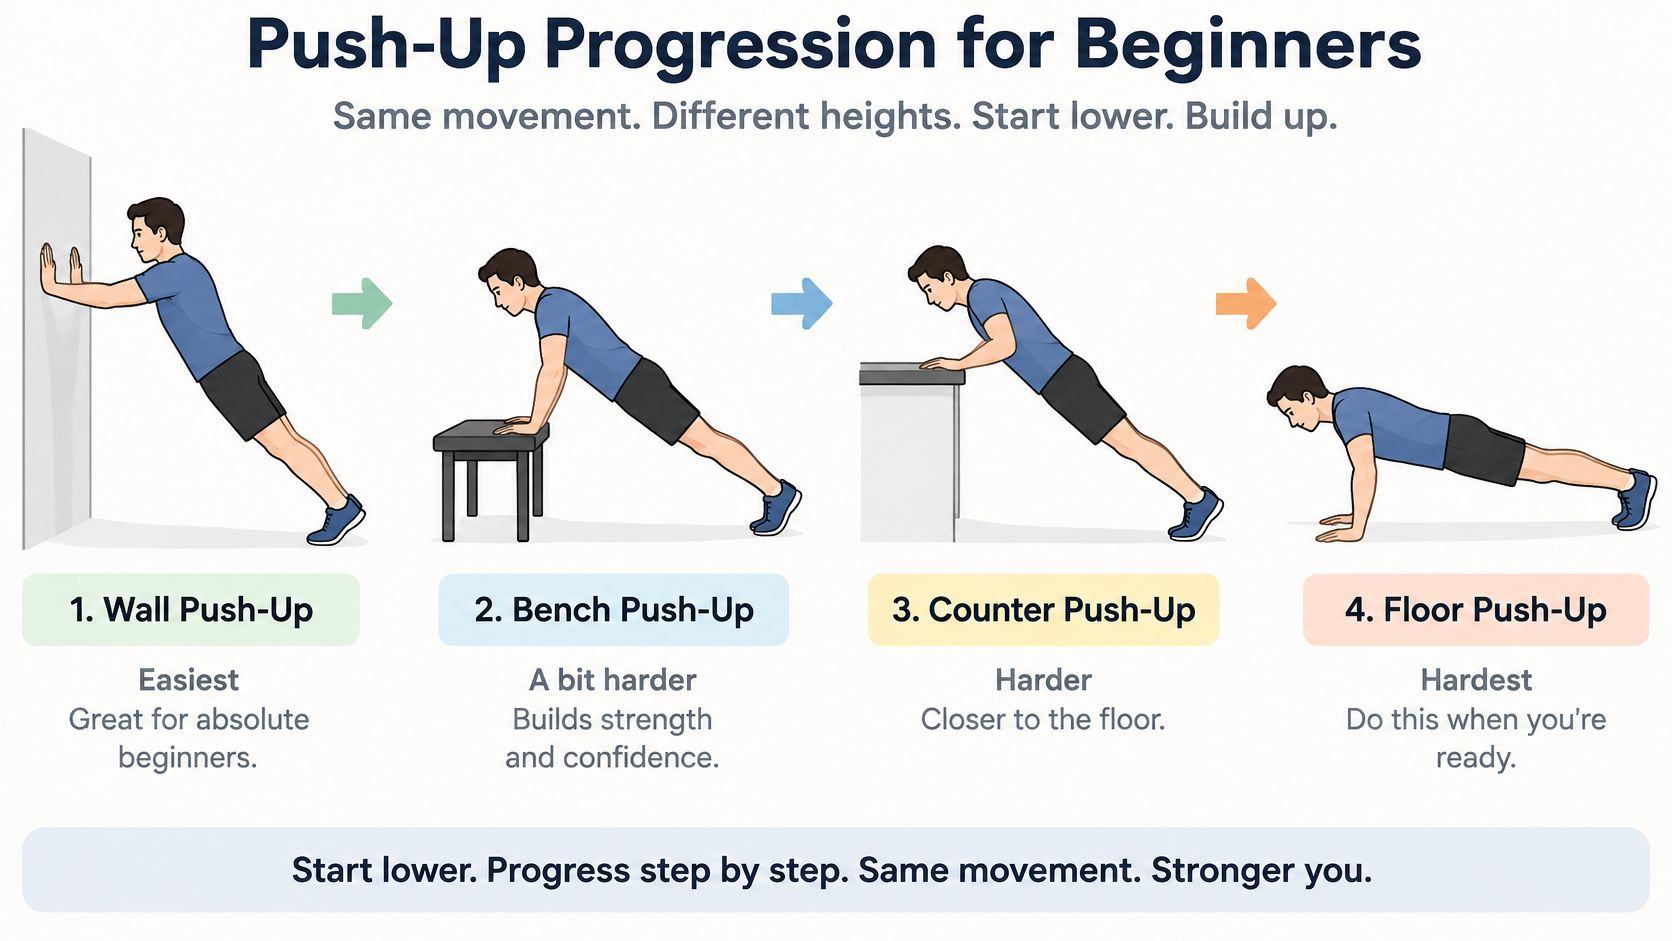
| Rung | Hand Position | Move Up When |
|---|---|---|
| Wall push-up | Hands on a wall at about shoulder height | Two to three sets of eight clean reps with no sag |
| Bench or counter push-up | Hands on a stable bench, counter or step | Two to three sets of eight clean reps with full control |
| Knee push-up | Hands on the floor, knees bent and supporting about 54% to 62% of body weight | Two to three sets of five to eight clean reps with full range |
| Full push-up | Hands on the floor, toes supporting | Repeatable clean reps at target depth without pain |
How Each Rung Earns the Next One
Start on a wall if a counter already breaks your line. Move to a bench or step next, lowering the surface height as you improve. The knee push-up is the main bridge to the floor, since research summarized by Cleveland Clinic, cited in the Navy Fitness guidance, estimates knee push-ups load approximately 54% of body weight in the top position and 62% in the bottom position, with a practical benchmark of 2 to 3 sets of 5 to 8 technically clean repetitions before you progress. That reduced load preserves the full pressing pattern while your strength catches up.
Watch how the hand position, body line, and elbow path stay identical as the difficulty changes in this walkthrough.
At every rung, your hands sit beneath or slightly wider than your shoulders, your abdomen and glutes stay braced, and your elbows track diagonally backward. Stop a set the moment alignment or depth breaks. One trap to watch for is staying on a high surface because it feels comfortable. Once a rung feels easy and your reps stay clean across several sessions, drop one rung lower. This ladder sits inside the broader approach in our guide to bodyweight training for beginners, where difficulty follows control rather than the calendar.
Choose Your Starting Variation Today
Don't guess your starting point. Test it. Put your hands on a bench or counter, set your body line, and do one slow set. Stop before your form breaks, not after, and note how many clean reps you managed and where things fell apart.
| Test Result | Start At |
|---|---|
| Five to eight clean reps on a bench or counter | Bench or counter, then build toward knee push-ups |
| Form breaks within one or two reps on a bench or counter | Wall or a higher surface, retest in two weeks |
| Full range held cleanly from the first rep | Full push-ups in micro-sets |
Matching Your Result to a Rung
If you managed five to eight clean reps, that surface is your training rung for now. Build your sets there, then work toward knee push-ups using the move up rules from the ladder. If your hips sagged or your depth shrank within one or two reps, there's no shame in the wall. Train there, retest in two weeks, and let the result move you down a rung.
If you held full range cleanly from the first rep on the floor, skip the ladder and begin with full push-ups in small sets. Whichever rung you land on, write the variation next to your reps every time. Eight knee push-ups and eight full push-ups are different achievements, and your log should say so.
Logging rule: Log only clean repetitions, with the variation named. Your record should describe what you actually did, not what you attempted.
SuperStrong is an iPhone app that records bodyweight sets as tiles on a shared wall for up to four friends. Bigger tiles mean more reps, so eight push-ups produce a small tile and thirty produce a big one. Logging takes four steps. You tap the big key, pick the exercise, set the reps or seconds, and confirm, and the tile lands on the wall. Treat that wall as a record of clean sets, not a verdict on your progress. SuperStrong is a log, not a coach or medical advice, so check with a doctor before starting a new exercise program.
Building a Daily Push-Up Routine from Micro-Sets
Stopping early is not quitting. For a beginner, ending a set while you still own the movement is usually smarter coaching than grinding out exhausted reps. Micro-sets build your day around that idea. Instead of three fixed sets pushed near failure, you scatter several very small sets across the day, each one finished with clear reps still in reserve.
What the Evidence Does and Does Not Say
This approach fits the emerging research on brief activity bouts. A 2025 systematic review and meta-analysis covering 27 trials and 970 participants reported improved maximal oxygen uptake and several cardiometabolic measures, including systolic and diastolic blood pressure, fasting glucose, LDL, and total cholesterol, compared with no intervention. Read that carefully, though. It supports short bouts as a practical format. It does not establish that any particular push-up schedule or rep count is optimal, and many of the included studies used short, higher intensity activity with varied designs.
So treat micro-sets with care. They're a consistency and skill strategy, not a shortcut to unlimited strength. Their real advantage is that a set of one to five controlled reps between daily tasks feels doable on a busy day, and doable training gets repeated. That's the same principle behind our guidance on how to build habits, where small repeatable actions beat occasional heroic efforts.
A Simple Weekly Build
- Start small: Spread three to five micro-sets through your day at your current rung, each well short of failure.
- Add slowly: Add a rep to your daily total only when the current total has felt easy for several sessions in a row.
- Raise difficulty last: Move up a variation only when the current one is pain-free and technically consistent.
- Track more than reps: Record your variation, total technically sound reps, how hard it felt, and any next-day soreness.
That tracking habit protects you from a common trap. If you chase personal records daily, you'll start shortening depth to feed the number. If you track perceived effort and next-day symptoms instead, you'll notice when a rung has become easy, which is the signal to progress.
A good day is a handful of sets you'd happily show on video. A bad day is a big number you couldn't repeat with the same form tomorrow.
Say your bench sets feel easy on Monday, Wednesday, and Friday, with no soreness the following mornings. That's your cue to add a rep or two, not a vague feeling that you should be further along. Progress earned this way is slower on paper and much faster in practice, because you never have to stop and rebuild a broken pattern.
Pain Signals That Mean Stop and Reassess
A shorter set that stays honest beats a longer one that falls apart. If your shoulders hike, your chest never reaches a full depth, or your elbows never straighten at the top, that repetition does not count. Stopping there is sound beginner coaching. You are protecting the pattern, not quitting the work.
Two people in the same class can need different starting points, and both can be training well. Body mass, arm length, wrist tolerance, shoulder mobility, and prior training all change how hard a push-up feels. A higher raw count from someone built differently tells you almost nothing about your own progress.
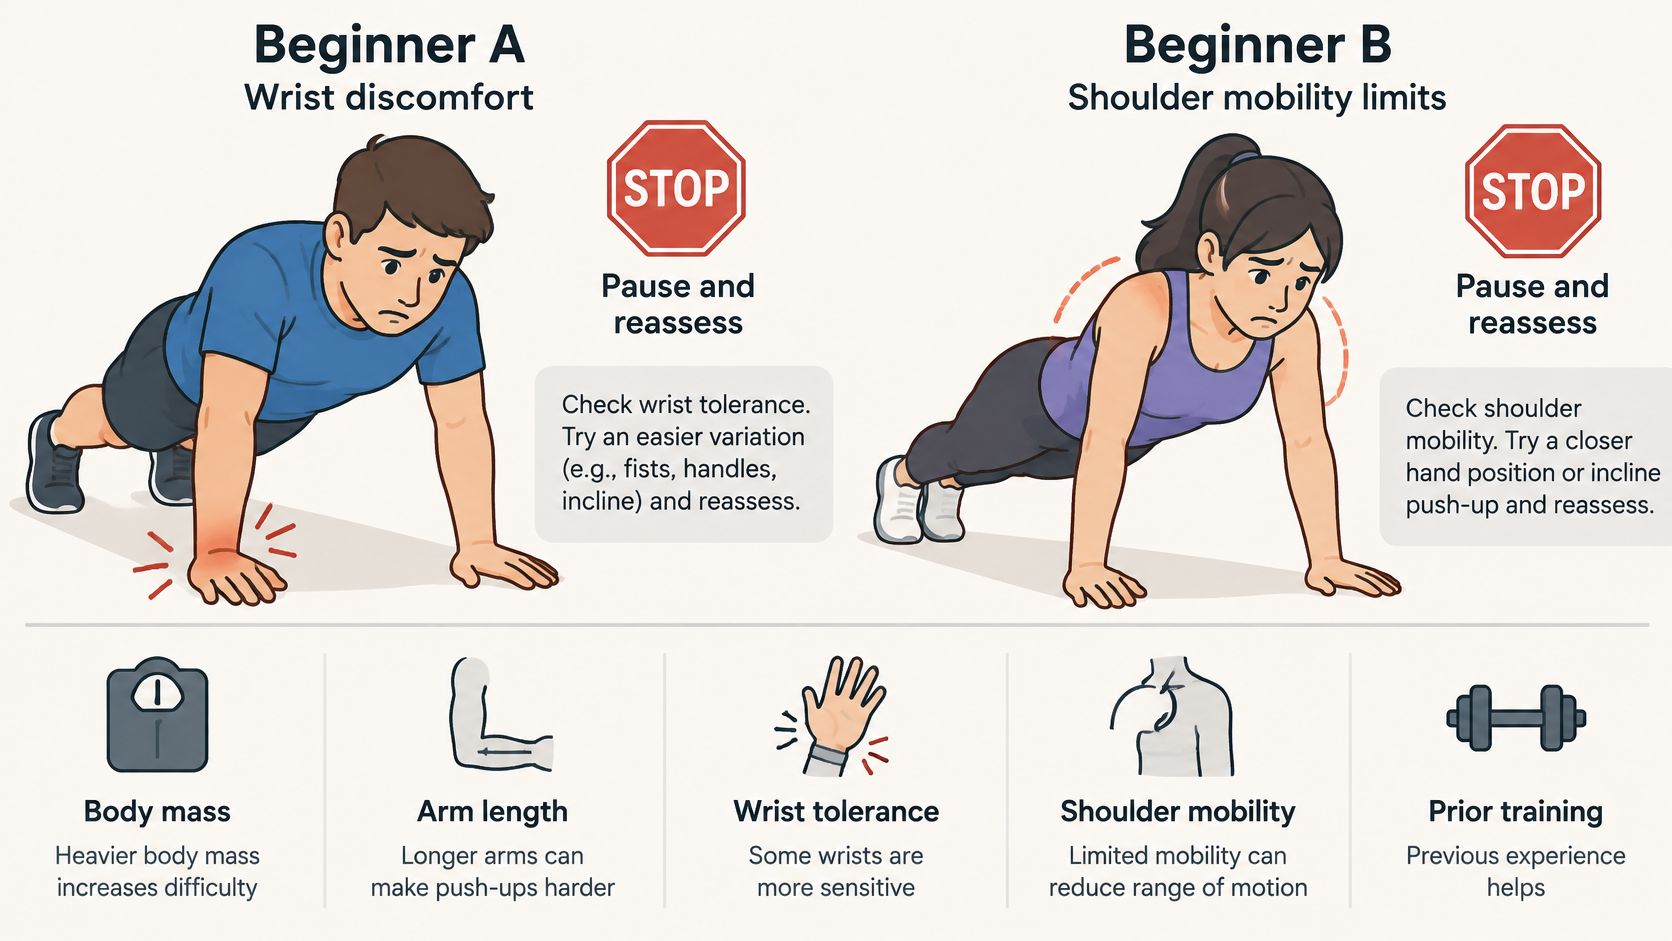
Effort Feels Different From Warning Pain
Productive effort is familiar and manageable. Muscles burn, arms shake near the end of a set, and you feel generally tired. That sensation fades soon after you stop. Warning pain is a different kind of signal, not a stronger version of the same burn.
A sudden, pointed pain in the wrist, elbow, or shoulder during the press means stop. Pins and needles, or numbness in the hands or arms while you press, means the same. Joint pain that is still there the next day, or that changes how you reach, carry, or stand up, means the set asked for too much.
Pain in the wrist, elbow, or shoulder during a set means you end that variation, rest, and drop to one easier version next time. Do not test whether it fades by forcing five more reps. Those extra reps usually buy a sloppier pattern.
Short bouts do not override that rule. The 2025 meta-analysis on brief activity bouts reported benefits from brief activity bouts alongside moderate evidence quality and variable intervention designs, so brief sessions are a practical format, not permission for maximal effort every time. Keep one or two clean reps in reserve, especially on a day when a joint already feels sensitive.
Muscle burn is information about effort. Sharp joint pain is an instruction to stop.
See a clinician if symptoms last beyond a few days, if pain changes how you move through daily tasks, or if you have an existing joint or heart condition. An early check keeps a small problem small, and you return with a range you can trust. SuperStrong is a log, not a coach and not medical advice, so check with a doctor before you start an exercise programme.
Start the next set where alignment, depth, and lockout all hold, and log only those clean reps. The tiles on your shared wall can show that honest progress building up with up to four friends. Visit SuperStrong to record today's micro-set in seconds and watch your wall fill with sets you would be happy to repeat tomorrow.