One Arm Dumbbell Swings: Form, Weights, and Reps
 13 min
You've got a dumbbell in hand, a little space at home, and a swing that felt clean with a kettlebell a minute ago. Then the hex head starts knocking your leg, the bell wants to drift, and the rep suddenly feels nothing like the version you thought you knew. That's the point where most lifters realize the one arm dumbbell swing isn't a kettlebell copy, it's its own lift.
Table of Contents
- What the One Arm Dumbbell Swing Actually Is
- Setting Up the Lift With Safe Form
- Choosing the Right Weight and Grip
- Common Mistakes That Break the Swing
- Reps, Sets, and Programming by Goal
- Safety Tips and How Often to Train It
What the One Arm Dumbbell Swing Actually Is
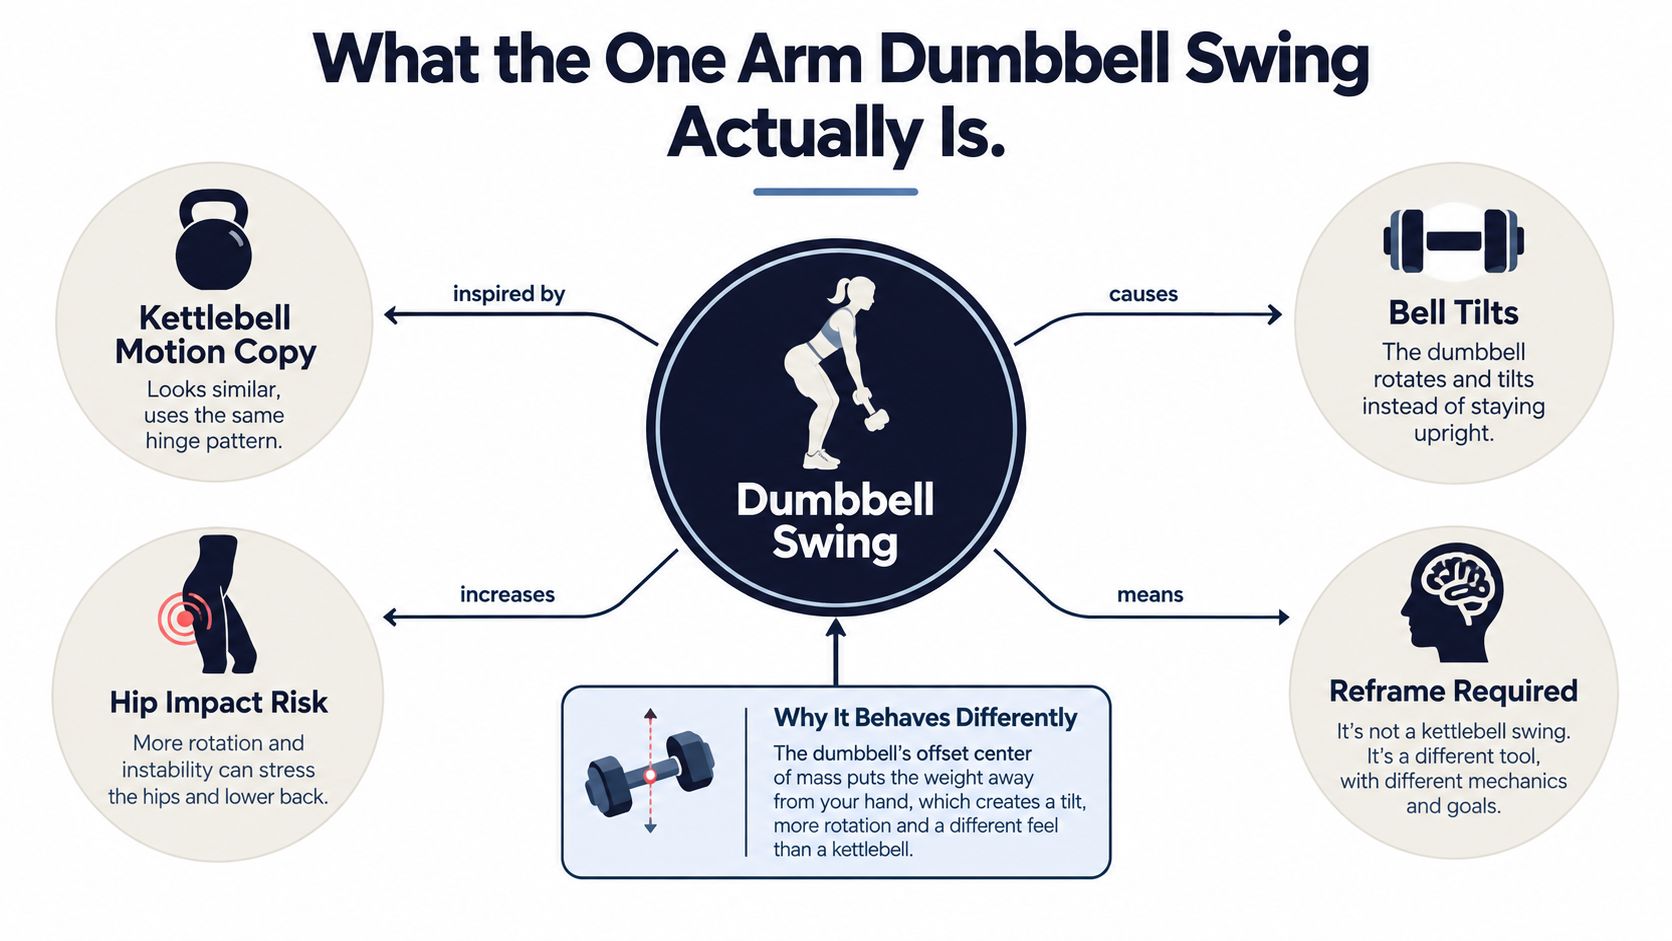
The one arm dumbbell swing is a single-side ballistic hip hinge, not an arm raise and not a dressed-up kettlebell swing. In its strictest form, the dumbbell moves from between the legs to roughly shoulder height because the hips snap open and send it forward, while the arm stays long and the trunk resists rotation. That distinction matters because the old competitive one-arm swing was treated as a serious strength lift in its own right, with contest records going back to at least 1880 and a clear historical line through the late 1800s into the early 1930s USAWA history.
The dumbbell changes the lift in four ways. The handle fixes the hand position, the hex heads shift the center of mass, the grip surface feels different from a kettlebell handle, and one side of the body has to resist rotation while the other side drives. That's why the bell can feel like it's steering you instead of the other way around.
Practical rule: if it starts looking like a squat, a press, or a side bend, you've already left the lift.
The old lift's history also matters because it explains why heavy ego loading is the wrong instinct. Elite performances climbed to 199 pounds with Jean Francois LeBreton, 220 pounds from Hermann Goerner in 1920, and 219 pounds from Charles Rigoulot in 1932 historical list. Those numbers show how serious the movement became, but they don't mean a modern home lifter should chase load first. If you're training in a small space, this is closer to an anti-rotation hinge drill than a max-effort power event, and that's the right lens to use.
For a practical home setup, a simpler drill can help you feel the hip pattern first, and this at-home no equipment workout is a useful companion if you're building consistency around short sessions.
Setting Up the Lift With Safe Form
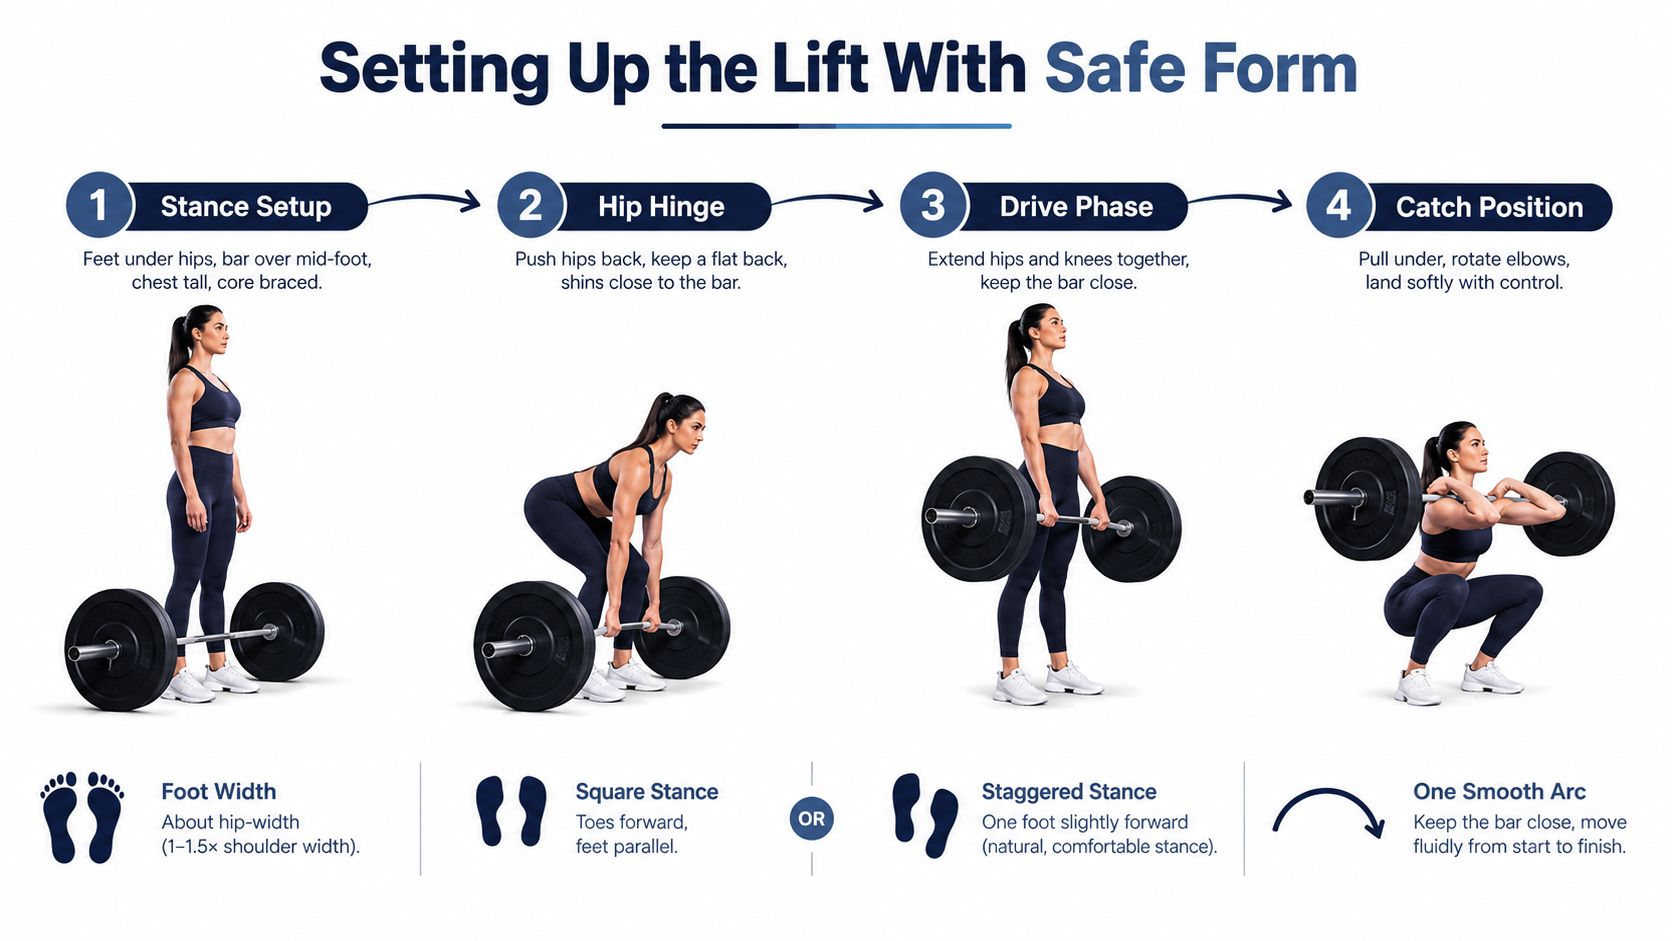
A clean one-arm dumbbell swing starts before the dumbbell moves. Set your position first, because once the bell leaves the floor or hangs in space, any wobble shows up fast. I coach this as a hinged drive with the free side staying honest, not as a kettlebell pattern borrowed from somewhere else.
Stance and hinge
Stand hip to shoulder width, then choose the foot position that keeps the dumbbell clear of your leg. Some lifters do better square, others feel steadier with a slight stagger, especially if the free side wants to twist forward. The goal is simple. Load the hips back while the spine stays neutral and the dumbbell has room to swing.
Use a soft knee bend and let the hips travel back first. The free hand can brace lightly against the thigh or stomach so you feel rotation early instead of after the rep is already messy. That hand gives feedback. It is not there for decoration.
Drive and catch
Drive the rep with hip extension, not with the arm. The dumbbell should rise because the hips snap and the trunk stays tall, while the hand only connects the load to the body. A single-arm swing guide describes the same basic hip-driven action, and that cue matters more with a dumbbell because the off-center load punishes lazy timing.
Keep the grip firm enough to control the handle, but not so tight that the forearm starts doing the work of the hips. Dumbbells also behave differently from kettlebells here. The hex heads can bump the legs, the handle can feel less forgiving, and a sloppy path shows up as rotation through the torso instead of clean float. That is why lighter loading usually gives better training value than chasing a bigger swing.
Keep the spine neutral, squeeze the glutes hard, and let the arm stay loose until the bell peaks.
At the top, finish with full body extension and a straight arm, then let the bell fall back under control. The rep should look like one uninterrupted arc, not a stop-start lift with a press at the top. If the shoulder lifts early, the torso twists hard, or the dumbbell drifts into the legs, the setup needs work before you add load.
Simple crawling drills can help on off days if you want better trunk stiffness and shoulder control for this pattern.
Choosing the Right Weight and Grip
Choose the load as a control test, not a toughness test. A one-arm dumbbell swing gets messy faster than a kettlebell swing because the weight sits farther from the hand, the handle is less forgiving, and the hex heads can pull the rep off line. If the dumbbell tilts, the torso starts to rotate, or the grip is slipping, the load is too heavy for the rep quality you have today.
Use the rep test before you call it working weight
Start with a dumbbell you can move for ten controlled reps per side without losing shape. Watch three things closely, the free arm stays quiet, lockout height stays the same rep to rep, and the torso does not chase the dumbbell. If any of those break down, reduce the load. The right starting weight is the one that lets you repeat the same arc, not the one that feels impressive in your hand.
Grip choice should fit the dumbbell and the conditions in the gym. A neutral suitcase-style grip works best for most lifters, with the thumb wrapped and the wrist fixed. If the handle gets slick, a thumb-forward hook-style hold can help you keep control. Advanced lifters sometimes use an offset grip for special variations, but that is a tool for later, not the default.
| Experience Level | Bodyweight Range | Suggested Starting Weight | Rep Range to Test |
|---|---|---|---|
| Beginner | Any | Light dumbbell you can control cleanly | 8 to 10 reps per side |
| Returning lifter | Any | Moderate dumbbell with perfect shape | 10 reps per side |
| Experienced lifter | Any | Lightest load that stays square | 10 to 12 reps per side |
A simple rule works here, choose the weight that keeps the free arm from flaring and the hips from twisting. If the torso rotates or the bell tilts, reduce load until the arc stays square for 10 reps per side. That usually produces better training value than chasing a heavier swing that turns into compensation.
Common Mistakes That Break the Swing
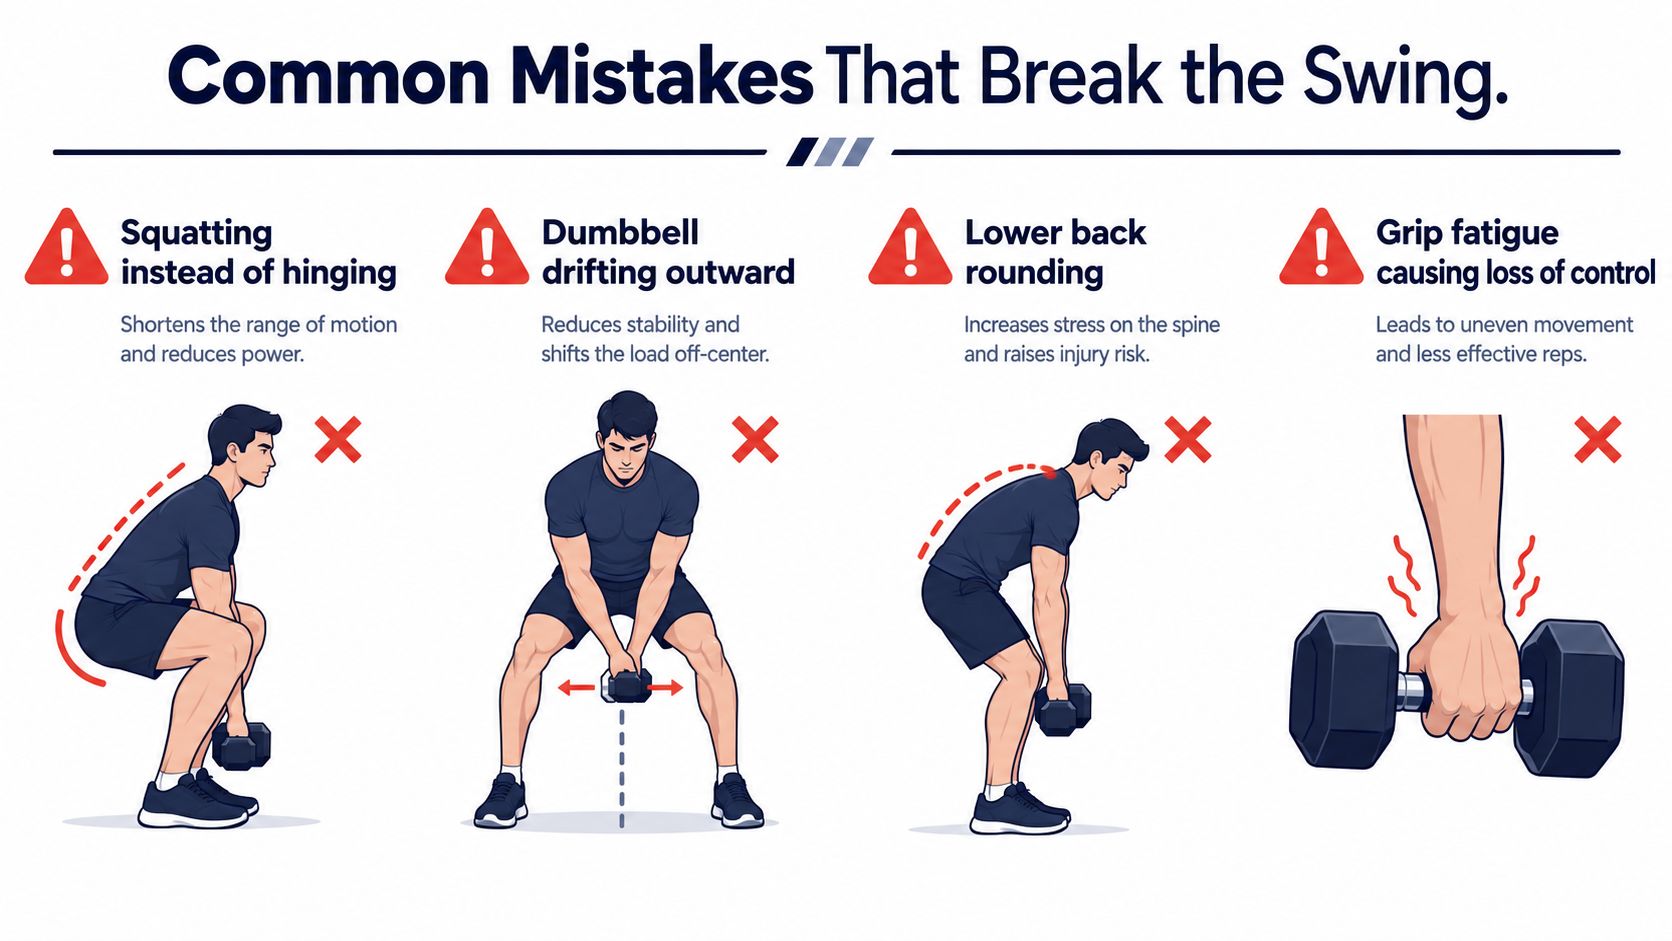
Most breakdowns in this lift are small, and they usually start when a dumbbell is treated like a kettlebell substitute. That creates sloppy reps, bruised forearms, and a swing that turns into a shoulder-led heave instead of a clean hip-driven hinge.
The faults I see most
- Squatting instead of hinging. The knees do too much, the hips stop driving, and the swing loses the elastic snap that makes it worth doing. Set the hips back first, then drive them through.
- Pulling with the arm and shoulder. This usually shows up when the load feels awkward or the lifter is trying to force speed. The arm should guide the path, not create the rep.
- Rounding the low back. A dumbbell swings differently from a kettlebell, and the hex head can punish a bad setup fast. If the bell drops too low or the reach gets greedy, shorten the hinge and keep the chest long.
- Drifting off-axis. The dumbbell wants to pull toward the loaded side, and that anti-rotation demand is part of the lift. If the path cuts diagonally, the trunk is losing position and the free side is not staying quiet.
- Pressing or shrugging at the top. A swing that turns into a press usually means the hips have stopped finishing the job. Stand tall, lock the arm, and let the bell float to its apex without adding a shoulder raise.
A strict technical guide makes the same core point, the movement is a hip hinge with a flat back and glute squeeze, and the main errors are losing continuity, drifting off-axis, or turning the finish into a press. That matches what shows up in real coaching sessions, especially when lifters chase heavier dumbbells before they own the shape.
If the rep burns more in the shoulders than the hips, the lift has already changed.
The quickest check is visual and tactile. The dumbbell should finish in the same lane every rep, and the catch should feel smooth rather than abrupt. With one-arm swings, the right correction is usually less load, a cleaner hinge, and a grip that stays firm without fighting the handle.
Reps, Sets, and Programming by Goal
The dumbbell swing works best when the plan matches the goal. If you want conditioning, power, or anti-rotation, don't copy one generic set scheme and hope it covers all three.
Pick the lane first
For conditioning, use lighter weight and crisp pacing. For power, use a moderate load and give every rep enough rest to stay fast. For anti-rotation, choose the lightest load that still makes the torso work, then slow the pace enough to feel each side resisting twist.
| Goal | Reps per side | Sets | Rest | Tempo cue |
|---|---|---|---|---|
| Conditioning | 15 to 20 | 3 to 5 | Short | Fast but clean |
| Power | 6 to 10 | 4 to 6 | Longer | Explosive, tall finish |
| Anti-rotation | 8 to 12 | 3 to 4 | Moderate | Deliberate, control the top |
A practical week can rotate those lanes instead of piling them together. Use one day for crisp conditioning, one for power, and one for slower unilateral control. That keeps the pattern fresh and reduces the chance that fatigue ruins the hinge.
For logging the work and keeping habits visible, a simple training record like this bodyweight workout journal pairs well with short home sessions, even when the actual load comes from dumbbells rather than bodyweight.
The key is to stop the set while the reps still look identical. Once the bell starts rising differently on each side, the set has turned into fatigue practice instead of skill practice.
Safety Tips and How Often to Train It
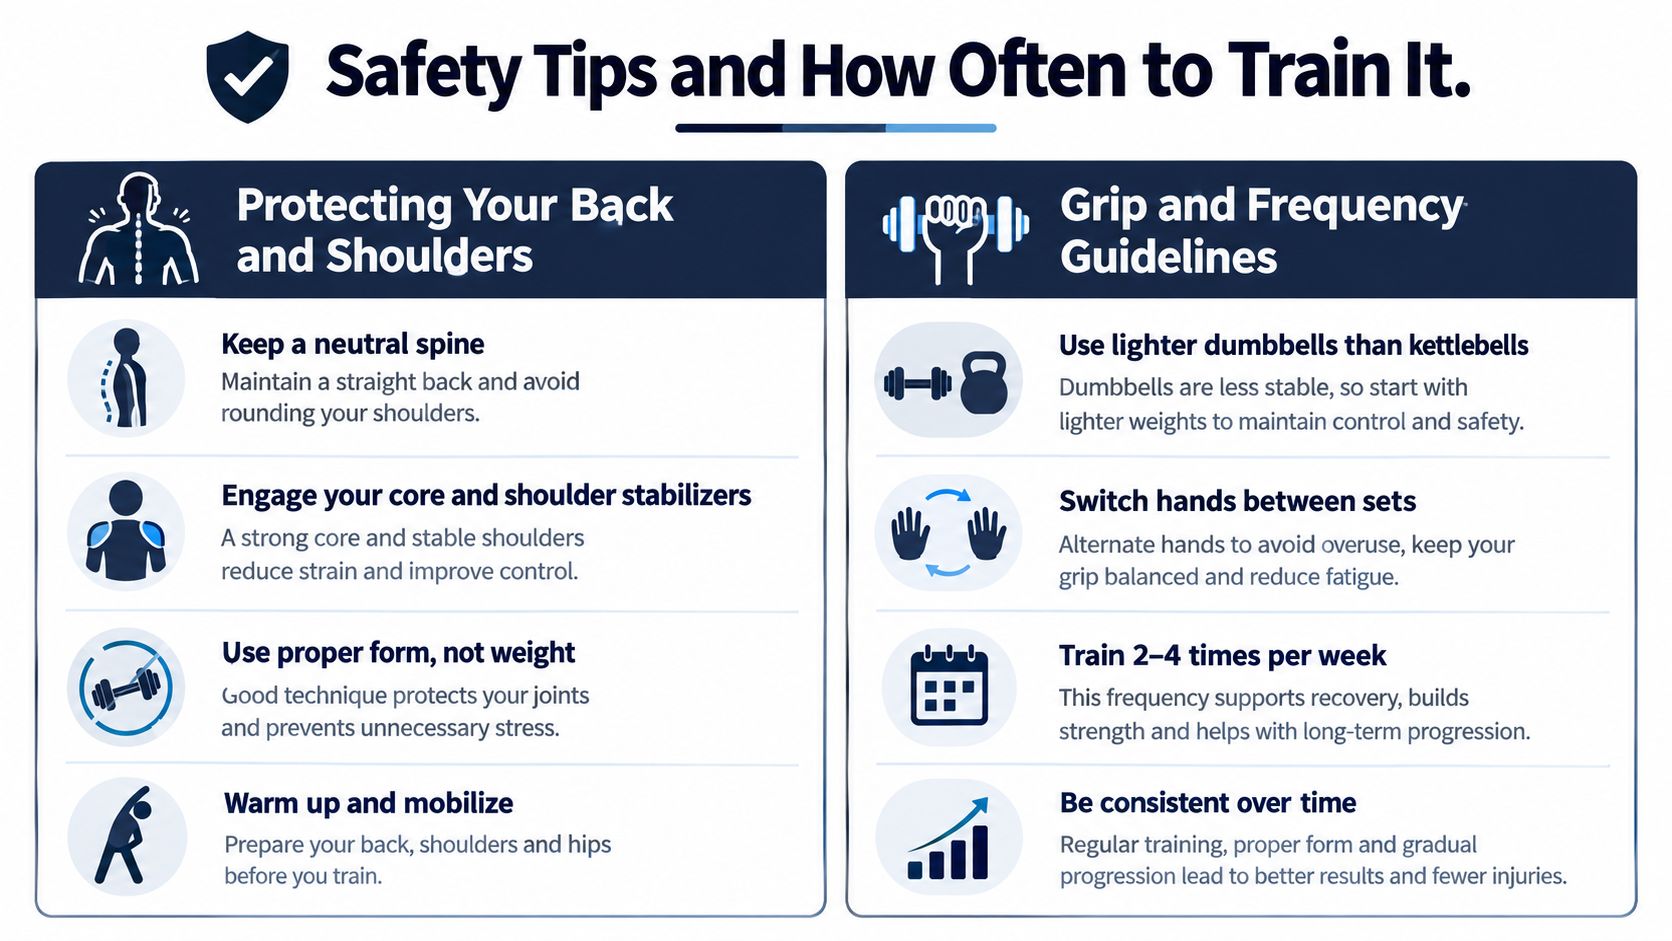
The safest version of this lift is the one you can repeat for months without irritating your back, shoulders, or grip. That usually means a lighter dumbbell than you think, clean hand switches, and enough recovery between hard sessions that your hinge stays sharp.
Protecting Your Back and Shoulders
Keep the load honest. Recent coaching coverage on dumbbell swing mechanics warns that the dumbbell shape can strike the forearm or leg, and that grip friction plus apex control become major failure points when speed or load rises dumbbell-specific coaching notes. That's why a lighter bell with cleaner timing is usually the smarter play.
Stop any rep that brings on lower-back ache. Don't try to earn through it. The swing is a hinge accessory, not a daily grind, and a tired spine loses the ability to keep the arc tight.
Grip and Frequency Guidelines
Switch hands every set to limit one-sided overuse. Sweep the floor before you start, because a dropped hex head can do real damage to a toe or shin. For frequency, two to three sessions per week with at least 48 hours between hard swing days is a practical ceiling for most lifters, especially when the movement is done with enough speed to matter frequency guidance.
Train the lift like a high-fatigue ballistic movement, not like an everyday filler.
That approach respects the asymmetry. It also keeps the lift useful as a power and anti-rotation tool instead of letting volume blur the technique and beat up the back.
SuperStrong helps you keep short training sessions visible, consistent, and easy to repeat, which matters when you're building a habit around home-based strength work. If you want a simple way to track small sessions and stay accountable while practicing movements like one arm dumbbell swings, visit SuperStrong.