How to Do Pull Ups Without a Bar: A Safe Progression
 19 min
You're standing in a small flat, maybe between meetings or after dinner, looking at a doorframe, a dining table and a curtain rod and wondering if any of them can stand in for a pull-up bar. You want a stronger back, but you don't have a bar, you can't drill into the wall, and you definitely don't want to pull furniture down on yourself. That's exactly where many people get stuck, and it's where learning how to do pull-ups without a bar has to start. You can't copy a pull-up with household objects. You can build the pulling strength that makes one possible, if you pick a substitute that matches your level, test the anchor before you trust it, and progress it gradually.
Table of Contents
- Pick a Pull-Up Substitute That Matches Your Level
- Test Your Anchor Before Any Body Weight Goes On It
- Run the Progression One Step at a Time
- Spread Short Pulling Sets Across Your Day
- Fix Pain, Stalls and Sloppy Reps
- Log Your First Week and Judge Progress
Pick a Pull-Up Substitute That Matches Your Level
Each option below is a different exercise with a different way to fail, so choose the lowest one you can finish with clean form. The rows come first because body angle makes them easy to scale up or down. The slow negative sits last because it asks you to control a large share of your body weight from a raised start.
Pull-up substitutes by starting level
| Option | Setup | Starting point | Progress by | Risk tier |
|---|---|---|---|---|
| Sturdy table row | Body under a rigid, verified table edge, hands gripping the edge | Body near horizontal, feet on floor | Raise the feet, lower body angle, add pauses | Low when the table is verified |
| Towel or bedsheet row | Towel over a secure, load-bearing anchor | Body near horizontal, feet on floor | Lower body angle, slow the lowering phase | Medium, anchor must be tested |
| Band-assisted pull | Band over a fixed overhead point that bears load | Band set to heavy assistance | Reduce band assistance, slow the lowering | Low to medium |
| Prone pull or reverse snow angel | Lying on the floor, no anchor needed | Full set of controlled reps on the floor | Add pauses, larger range of motion | Lowest |
| Slow negative pull | Stable platform to start from the top | Lower slowly from the top, no jumping | Lengthen the lowering, reduce the platform height | High, use only when the platform is stable |
How to Read This Table Without Guessing
Read down, not across. If you can't hold a rigid body line under a table or keep your shoulders down during a towel row, that level is still ahead of you, even if the movement looks similar to a pull-up. Drop to the prone pull or reverse snow angel and build control there first. It's the only option with no anchor to fail, and it still teaches you to move your shoulder blades without shrugging.
If you can finish a table row set with two or three clean reps still available, that's your working level. Stay there until it feels easy, then move one step down the table or make the same row harder. Don't jump from a floor move straight to a slow negative because you're impatient. The negative earns its high risk tier: the platform has to hold you at the top, and you have to control the load the whole way down.
Why None of These Is Really a Pull-Up
Be clear about what you're trading. A strict pull-up lifts most of your body mass against gravity while your hands stay fixed overhead. A row lets your feet carry part of the load, and a band changes the load at different points in the rep. These moves still train your upper back, elbow flexors and grip, and bodyweight work at home can build real pulling strength when you progress it deliberately. What they can't do is count as pull-up reps.
Working rule: Treat each substitute as its own exercise with its own setup and failure mode, not as a counted pull-up rep that happened at home.
When a row gets easy, change one variable at a time. Lower your body angle, add a pause at the top, slow the lowering, or reduce band help. Changing everything at once makes soreness worse and tells you nothing about which change worked. If you're building a wider routine around this, our guide to how to build upper body strength at home shows how pulling fits alongside pushing and core work without piling everything into one session.
I would start almost every beginner on a verified table row or a prone pull, not a towel hung over the nearest door. The towel row works, but only on a secure point, and beginners routinely overestimate what "secure" means on the first try. Pick the option you can already control, make it harder one variable at a time, and the substitute stops feeling like a compromise.
Test Your Anchor Before Any Body Weight Goes On It
The most common household mistake is grabbing a door or a curtain rod because it's at the right height. Height isn't the test. Load-bearing capacity is, and a substitute that looks fine at rest can still slide, swing or release the moment your feet leave a stable base.
Household anchors and safety verdicts
| Anchor | Verdict | Reason |
|---|---|---|
| Interior door | No-go | Can slide or swing open, and hinge direction changes the failure |
| Curtain rod | No-go | Can pull from the wall or release under load |
| Lightweight folding table | No-go | Can tip or collapse under body weight |
| Loose shelving | No-go | Can release suddenly |
| Unstable chair | No-go | Slides or tips when loaded |
| Heavy table with rigid legs | Test first | Use for rows only after it passes a firm load test with no movement |
The Load Test That Replaces Guessing
Press or pull firmly and slowly, building toward full body weight, before you do a single rep. Watch the legs, hinges and contact points, not just the grip. You're looking for movement, creaking, lift at the far legs, or a joint that starts to open. Any of those means stop. Don't bounce the load to test it harder. A slow, firm pull tells you enough without creating the failure you're trying to avoid.
For a heavy table, keep your body under the edge so the force pulls toward the table, not across it, and brace the legs against the floor where you can. Push a leg against a wall or place something heavy against the far side if the table wants to travel. For an overhead band anchor, the point must not move under load at all. If it flexes, rotates or makes noise, it isn't an anchor for vertical pulls, no matter how strong the band is.
Why the No-Go List Isn't Negotiable
An interior door can swing toward you or away from you depending on hinge direction, so the same setup fails differently in different rooms. A curtain rod is usually held by small brackets designed for fabric weight, not a person. Loose shelving and unstable chairs don't warn you politely. They release or tip, and you fall with your grip still closed around something that's now falling with you. A secure setup matters more than a clever improvised grip because an uncontrolled fall is how a back workout becomes a wrist, shoulder or head injury.
Plan the bailout before you start. Keep your feet near the floor for rows, clear anything sharp or hard from underneath you, and stop the moment the anchor shifts during a set. Don't finish the rep to see if it holds.
Check with a doctor before starting a new exercise programme, and don't pull if you already have a shoulder or elbow injury. We're clear that SuperStrong is a log, not a coach and not medical advice, so pain or a prior injury is a medical question, not a programming tweak. If the test doesn't pass, use the prone pull from the floor. You'll lose nothing by training without an anchor for a week, and you'll avoid the one failure you can't coach your way out of.
Run the Progression One Step at a Time
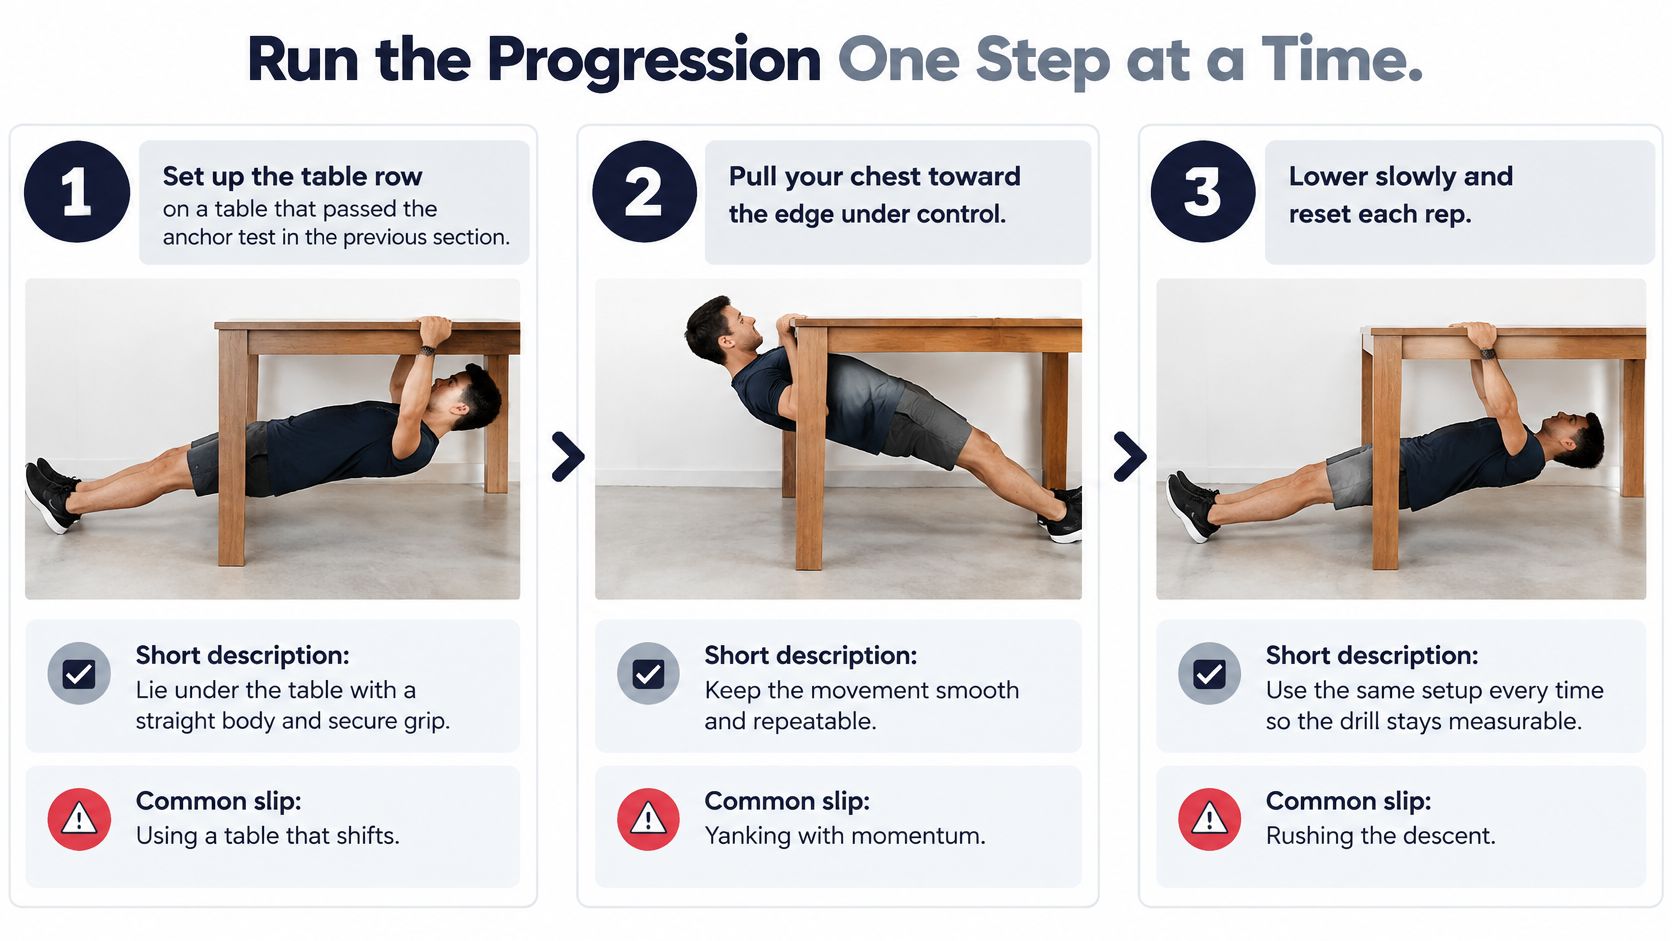
Run this as a staged build, not as a test of toughness. Each step earns the next one.
-
Set up under a verified edge. Use a sturdy table that passed your load test, lie underneath it, and grip with your whole hands, not just your fingers on a thin lip. Keep your body rigid from heels to head so the work stays on your back and arms rather than sagging into your lower spine.
-
Start at an angle you own. Set your body where you can finish the set with two or three clean reps left in reserve. Starting too horizontal is the common slip here. Your hips take over, your chest never reaches the surface cleanly, and you record reps that don't reflect back strength.
-
Pull your chest toward the surface. Move your elbows toward your ribs and keep your shoulders away from your ears. Then lower under control over a couple of seconds. Rushing the lowering is where most beginners remove most of the training stimulus, because the controlled descent is a large part of the work.
-
Make one change. Raise your feet onto a low step, make your body more horizontal, or add a one-second pause at the top. Pick one. If form holds for the full set, keep it. If you start swinging or shrugging, you've changed too much or changed it too soon.
-
Add a band-assisted vertical pull only with a tested overhead anchor. Loop the band over a fixed, load-bearing point, use heavy assistance at first, and finish each rep with your shoulders controlled and elbows moving toward your ribs. If you don't have that anchor, don't invent one. Stay with rows and floor work. If you're still learning the broader pattern, bodyweight training for beginners covers how to sequence these basics across a week.
-
Increase the workload gradually. The ACSM resistance-training guidance supports increasing workload by roughly 2 to 10% once you can complete the current workload comfortably for one to two additional repetitions. In row terms, that might be a slightly lower body angle or one extra clean rep, not a brand new exercise after one good session.
-
Stop for sharp pain. Sharp shoulder, elbow or wrist pain ends the set. Don't pull through it to finish a target number. Use the pain checks later in this guide, regress the movement, and only return once ordinary reps feel clean again.
If you have to yank, kick or hold your breath to make a rep count, it doesn't count for progression. Lower the difficulty and make the next rep boringly controlled.
What Good Form Actually Looks Like
Your ribs stay down, your neck stays in line with your spine, and your shoulder blades move without your whole torso rocking. Your grip is firm but your forearms shouldn't be the first thing to fail on every set. If they are, the edge may be too thin or the angle too steep. Adjust the setup rather than accepting sloppy reps.
Train this two or three times a week on non-consecutive days rather than testing yourself daily. A row you can repeat on Thursday exactly as you did it on Monday is measurable. A maximal effort on a different table, at a different angle, after a different warm-up is just a number you can't trust. Keep the setup identical, keep the tempo identical, and let small, boring progressions compound.
Slow negatives belong at the end of this sequence, not the start. Use them only when a stable platform lets you begin at the top without jumping, and only for a few controlled lowers. Jumped starts plus fatigued shoulders are how people end up dropping the last part of the rep, which is precisely the part they were trying to train.
Spread Short Pulling Sets Across Your Day
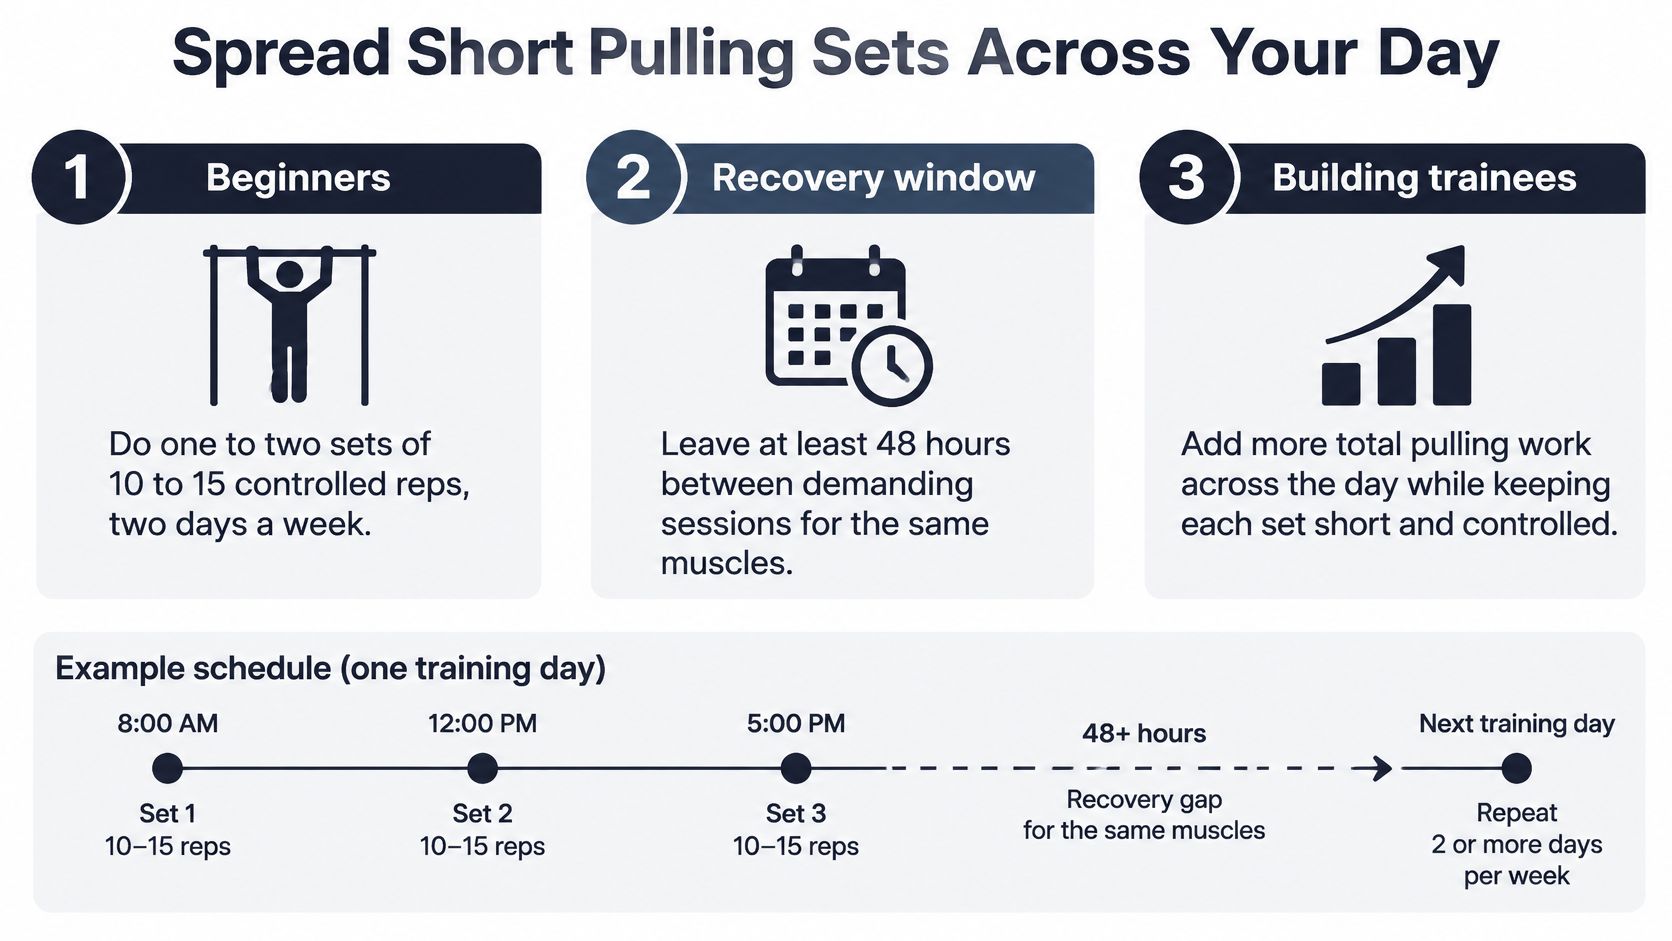
Short sessions work only if the dose matches your stage. Start from the table, then decide whether spreading sets across the day helps you hit that dose.
Sets, reps and sessions by training stage
| Stage | Sessions per week | Sets per session | Reps per set | Rest between demanding sessions |
|---|---|---|---|---|
| Starting out | 2 | 1 to 2 | 10 to 15 controlled reps | At least 48 hours |
| Building | 2 to 3, non-consecutive | 2 to 3 | 8 to 12 | At least 48 hours |
| Established | 3, non-consecutive | 2 to 4 | 8 to 12, with harder leverage or pauses | At least 48 hours |
What Micro-Sets Do Well
A micro-set is a brief, submaximal bout you place between normal tasks, such as one controlled set of rows after a work call or a floor pull while lunch heats up. You're not chasing failure. You're accumulating clean volume you wouldn't otherwise do because a full workout block never appears in your day.
The duration in the research is short. A 2025 scoping review in Sports Medicine-Open examined 33 original exercise-snack studies involving 1,118 participants, and the median exercise-snack duration was 120 seconds, with studies ranging from 20 to 720 seconds. For pulling, that maps well to one or two controlled sets, a short pause, and then getting on with your day.
Say your schedule is fragmented. Two row sets lasting about 90 seconds in the morning and one assisted hold at lunch give you practice at three separate points without turning any single bout into a grind. That can suit beginners especially well, because technique is usually cleaner in rep six of a fresh micro-set than in rep six of a fourth back-to-back set.
Where Micro-Sets Stop Being Enough
Don't oversell them for maximal pull-up strength. Short bouts are useful for building general fitness, practising the pattern and accumulating volume, but the exercise-snack evidence doesn't show they reliably replace harder, progressively loaded strength work. At some point your limiting factor won't be time or habit. It'll be that your rows are too easy at the angle you keep repeating.
That's when you add the harder work from your stage. Keep micro-sets on busy days if they help you stay consistent, but keep at least your main pulling sessions structured, rested and progressively harder. Use the table. Beginners don't need four sets. Established trainees don't need endless easy reps. They need harder loading, pauses or slower lowering within the set and rep ranges shown.
Short sets solve an access problem. Progressive difficulty solves a strength problem. Don't confuse the two.
Keep at least 48 hours between demanding sessions for the same muscles even when individual bouts feel small. Several near-maximal snacks spread across Monday and repeated on Tuesday still add up to stressed elbows and shoulders. If a micro-set leaves you unable to do the next one cleanly, it wasn't submaximal. Make it easier, spread it further apart, or do fewer bouts that day.
Fix Pain, Stalls and Sloppy Reps
The most common problem isn't weakness. It's a shoulder or elbow that aches the day after a set, followed by a decision to push through anyway because the plan says it's a training day.
Joint Ache the Day After
Learn the difference between muscle soreness and joint pain. Soreness feels diffuse in the back or biceps, eases as you warm up, and settles over a day or two. Joint pain feels local and specific, often at the front of the shoulder, inside the elbow or in the wrist, and it can show up when you reach, carry or press into a chair to stand.
If it's joint pain, reduce the difficulty at your next session. Adjust the body angle to make it easier, shorten the range slightly, and slow down. Wait until symptoms settle before progressing again. Don't test it with a harder variation to see if it's serious. If pain persists or keeps returning, get advice from a clinician before trying again.
Reps That Stop Improving
A stall for two or three weeks usually has a boring cause. Check three things in order.
- Step size: Did you lower your angle and add pauses in the same week? Undo one change and rebuild.
- Spacing: Did demanding sessions drift closer together because micro-sets crept onto rest days? Restore the gap.
- Effort level: Have you been taking every set to your maximum? Leave clean reps in reserve and let performance rise across sessions.
Beginners often stall because every workout becomes a rep test. You don't need a new exercise. You need repeatable sets at a difficulty you can recover from, progressed in smaller steps.
Form That Falls Apart
Shrugging usually means the load is too hard or you're pulling with your neck and upper traps first. Reduce the range, pause briefly at the top, and think about elbows to ribs. Swinging hips mean you're borrowing momentum. Slow the lowering, reset your body line before every rep, and stop the set when you can't stay rigid. Flaring elbows often improve when you make the angle easier and grip a surface that lets your hands stay roughly shoulder-width rather than forcing a wide, awkward hold.
One rule covers most of this. If a fix hasn't worked after two weeks, return to the previous stage and rebuild from there rather than pushing harder. Regressing for a fortnight costs little. Training through irritated joints for a month costs far more, and it usually ends with you stopping altogether.
Log Your First Week and Judge Progress
Log every set, not just the best one. Consistent, measurable training beats maximal effort every day because it shows you whether the same setup is getting easier.
For each session, record the exercise, reps or seconds, the body angle or band you used, and whether the last two reps stayed clean. Note next-day shoulder or elbow response in one short line. That last detail matters more than people expect. A set that looks successful on paper but leaves joint pain the next morning isn't a progression you should repeat.
The ACSM Health and Fitness Journal programme guidance states beginners should perform muscular-fitness training at least 2 days per week, which gives your first week a simple shape. Do two sessions, log both fully, and judge them against three signals.
- Same work, less effort: The same reps at the same angle feel easier by the second session.
- Reps in reserve: Each set finishes with two or three technically clean reps still available.
- Quiet joints: No shoulder, elbow or wrist pain appears later that day or the next morning.
When all three hold for a full week, move up one step. If any one fails, stay where you are and repeat the stage. That's not a missed week. That's the system working, because it stops you progressing on the back of one unusually fresh morning. A simple bodyweight workout journal approach, paper or digital, is enough as long as you write the setup down before memory edits it.
One practical option is SuperStrong, an iPhone app that logs bodyweight exercise sets as tiles on a wall. To log a set, you tap the big key, pick an exercise, set the reps or seconds for a hold and confirm, and the tile lands on the wall. The bigger the tile, the more reps logged, so eight push-ups makes a small tile and thirty push-ups makes a big one. It's a log, not a coach, so you still choose the movement, test the anchor and decide when to progress.
Your action for this week is specific. Choose one row you can do cleanly, test its anchor, run two sessions, and log every set with its angle or band before the next session starts. Don't add a new substitute midweek. By the end of those two logged sessions you'll know whether you're building pulling strength or just collecting tired reps, and that distinction is what moves you toward a real pull-up.
You don't need a perfect home gym to make your bar-free pulling work visible, you need each tested, clean set recorded in the same place so next week's progression is obvious. SuperStrong lets you log rows, holds and other bodyweight sets in seconds as tiles on a shared wall, with bigger efforts showing up bigger. Start your wall this week, log your two pulling sessions accurately, and let the record tell you when you're ready for the next step.