10 Exercises for Toning Body at Home: Quick Micro-Workouts
 19 min
You're back from the school run, your first meeting starts soon, and the kitchen floor is the only workout space available. There's a sturdy chair nearby, but not enough time to change clothes, drive to a gym, and follow a full routine. A short set of counter push-ups now, squats before lunch, and floor exercises later is a more workable starting point.
The advantage isn't that scattered sets have special fat-burning powers. It's that you can repeat them. Toning means building or preserving muscle while managing overall body composition, not choosing a special category of light exercise. Your food intake, starting point, and consistency influence how much muscular definition you eventually see.
Short workouts deserve realistic expectations. A review of exercise snacks found promising evidence for cardiorespiratory fitness, while several other outcomes remained uncertain. Treat micro-sets as manageable training opportunities, not a guaranteed shortcut to visible abs.
Start with repeatable effort. A controlled set you can fit into an ordinary day is more useful than an ambitious routine you keep postponing.
These exercises for toning your body cover pushing, pulling, legs, hips, and trunk control. You won't need to perform every movement every day, and easier versions count when they challenge you appropriately. Most suit a simple home setup, although pulling exercises require properly secured equipment. If you have medical concerns, check with a doctor before starting.
Table of Contents
- 1. Push-Up
- 2. Pull-Up
- 3. Inverted Row
- 4. Chair Dip
- 5. Bodyweight Squat
- 6. Glute Bridge
- 7. Reverse Lunge
- 8. Bird Dog
- 9. Plank
- 10. Dead Bug
- How the 10 bodyweight toning exercises compare at a glance
- Turning Ten Short Sets into a Toning Habit You Can Track
1. Push-Up
The push-up is a practical first choice because you can adjust the difficulty without buying equipment. It trains your chest, shoulders, and triceps while your trunk works to keep your body aligned.
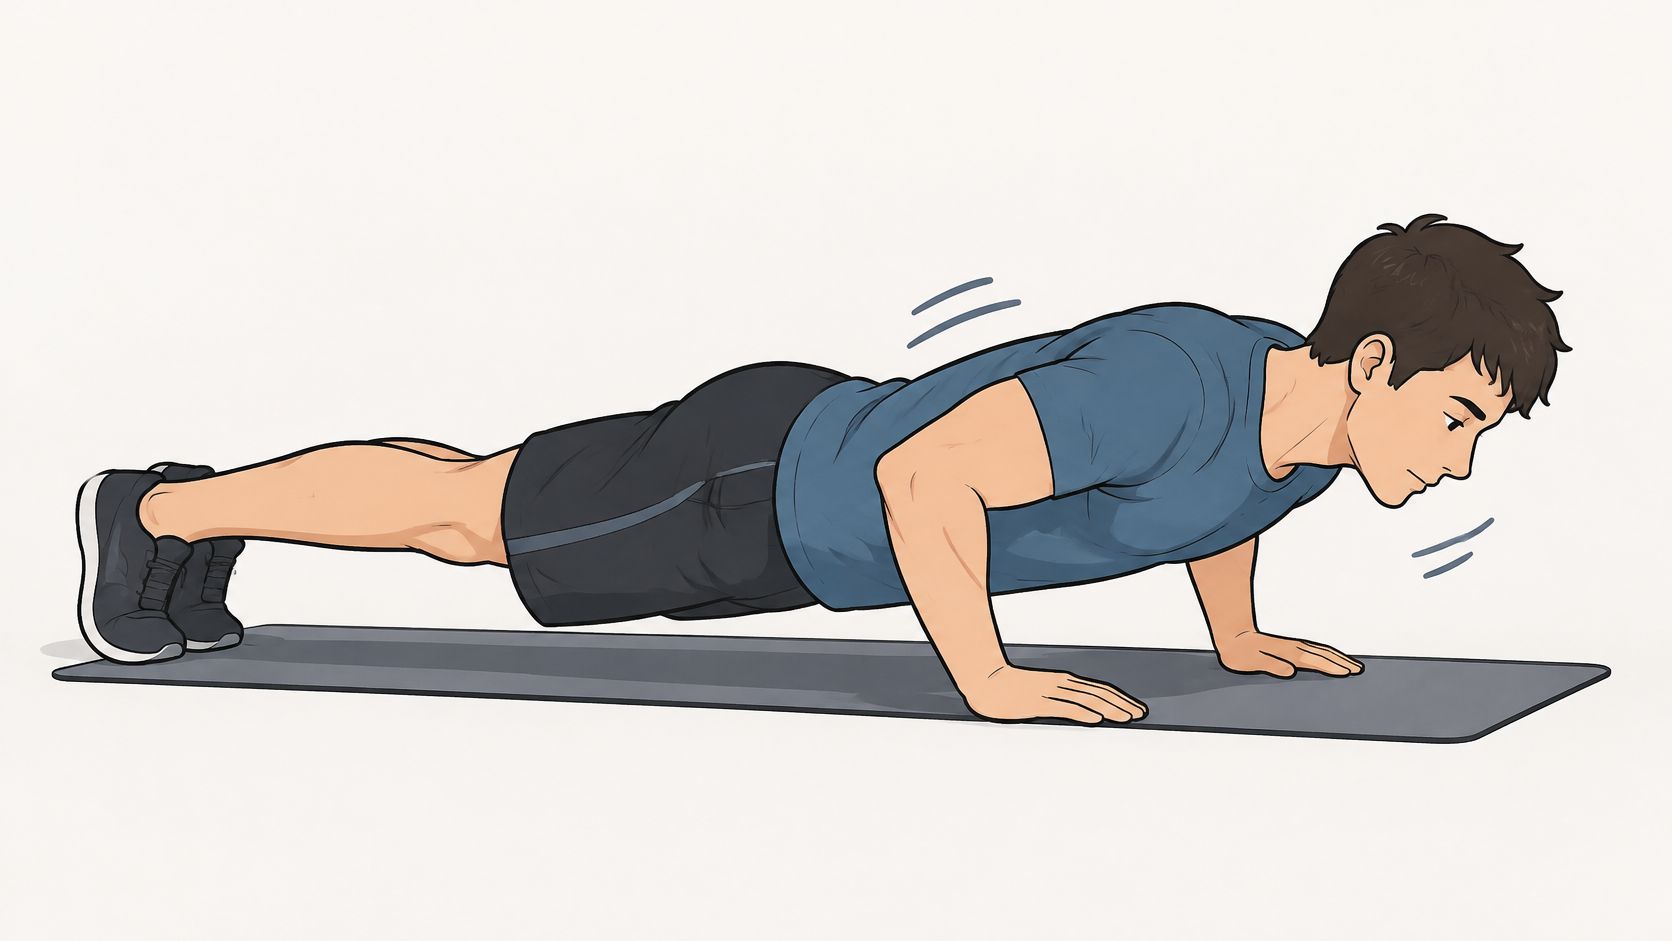
For a kitchen-break micro-set, use a fixed countertop rather than immediately dropping to the floor. Place your hands slightly wider than your shoulders, step back, and lower your chest toward the counter with your elbows angled back rather than flared sideways.
Make the Incline Work for You
- Start higher: Use a wall if a countertop version makes your hips sag or your shoulders shrug.
- Keep your shape: Brace your abdomen and move your chest and hips together.
- Finish cleanly: Stop while you could still complete another controlled repetition, rather than grinding through a collapsing final rep.
Say you finish a work call and have time before the next task. Perform a short set, record the variation and repetitions, and move on. Repeat later only if your arms feel recovered and your technique remains steady.
Lower the support when the current version becomes comfortably repeatable. A lower incline increases the challenge, so your repetition count may fall. That's progress, not failure. Don't compare wall push-ups with floor push-ups as though they're the same workload.
2. Pull-Up
Pull-ups provide a substantial upper-body challenge, but they're an optional destination, not a beginner entry requirement. Your back, biceps, and grip must move your body against gravity, which makes even a brief set demanding.
Use only a bar designed for bodyweight exercise and installed according to its instructions. Check the frame, fixings, and bar before loading it; a convenient overhead surface isn't necessarily a safe anchor.
The demonstration shows the movement pattern.
Choose an Achievable Pulling Set
Begin with straight arms and controlled shoulders, provided that position is comfortable. Draw your shoulders away from your ears, pull your elbows down, and lift without kicking or craning your neck. Lower deliberately rather than dropping.
If you can't complete a full repetition, use suitable assistance or controlled lowering from a secure step. Keep your feet available to help, and stop before you lose control. Lowering-only repetitions can still be demanding, so don't repeatedly squeeze them into every break.
For example, put your pulling set before lunch, when you're fresh enough to concentrate on grip and setup. Record assisted repetitions separately from unassisted ones.
If you don't have a suitable bar, explore these alternatives to pull-ups without a bar. Never improvise an overhead anchor from a door, shelf, or unsecured furniture.
3. Inverted Row
For someone who can't yet do a pull-up, the inverted row offers a more adjustable pulling movement. You pull your chest toward a secure support while keeping your trunk steady, training your back, rear shoulders, and biceps.
The difficult part at home is often the setup, not the exercise. A dining table is suitable only if its construction can safely withstand the load and pulling direction. Skip glass tops, folding furniture, pedestal tables, and anything that slides or tips.
A table that holds dinner isn't automatically safe to hang beneath. If you can't verify the support, choose purpose-built equipment or another pulling exercise.
Adjust the Body Angle
With a verified support, grip securely and begin with bent knees and your feet planted. Brace your abdomen, pull your chest toward your hands, and lower without letting your shoulders lurch forward.
- Make it easier: Keep your knees bent and use a more upright position where the equipment allows.
- Make it harder: Gradually straighten your legs or move toward a flatter body angle.
- Keep it honest: Move your chest toward the support instead of lifting only your chin.
A returning exerciser might perform a short row set between desk tasks, then leave pulling work alone until later. Log the setup alongside the repetitions. More repetitions at an easier angle aren't directly comparable with fewer repetitions at a harder angle, so keep the variation consistent when judging progress.
4. Chair Dip
Chair dips fit into a lunch break, but they're not an essential exercise. They emphasize the triceps, and the position behind your body can be uncomfortable for some shoulders. If the movement pinches, use close-grip incline push-ups instead.
Choose a heavy, non-wheeled chair on a nonslip surface, positioned so it can't slide. Sit at the front edge, place your hands beside your hips, and move your hips just clear of the seat with your knees bent.
Keep the Range Modest
Bend your elbows backward and lower only through a comfortable range. Keep your hips near the chair and your shoulders away from your ears, then press back up without bouncing.
- Regress with your legs: Keep your feet close and use them to share the load.
- Progress cautiously: Move your feet farther away only after the bent-knee version feels controlled.
- Respect shoulder discomfort: Don't chase extra depth or continue through a sharp sensation at the front of the shoulder.
For a practical micro-set, try dips during a home lunch break on a day when you haven't already exhausted your arms with push-ups. You don't need both pressing movements in every session.
A small, comfortable range beats a deep dip you can't control. If you spend more effort managing shoulder discomfort than working your arms, replace the exercise rather than trying to force an adaptation.
5. Bodyweight Squat
Getting up from a chair already contains the basic squat pattern. Training it deliberately gives your quadriceps and glutes a repeatable lower-body challenge without needing much space.
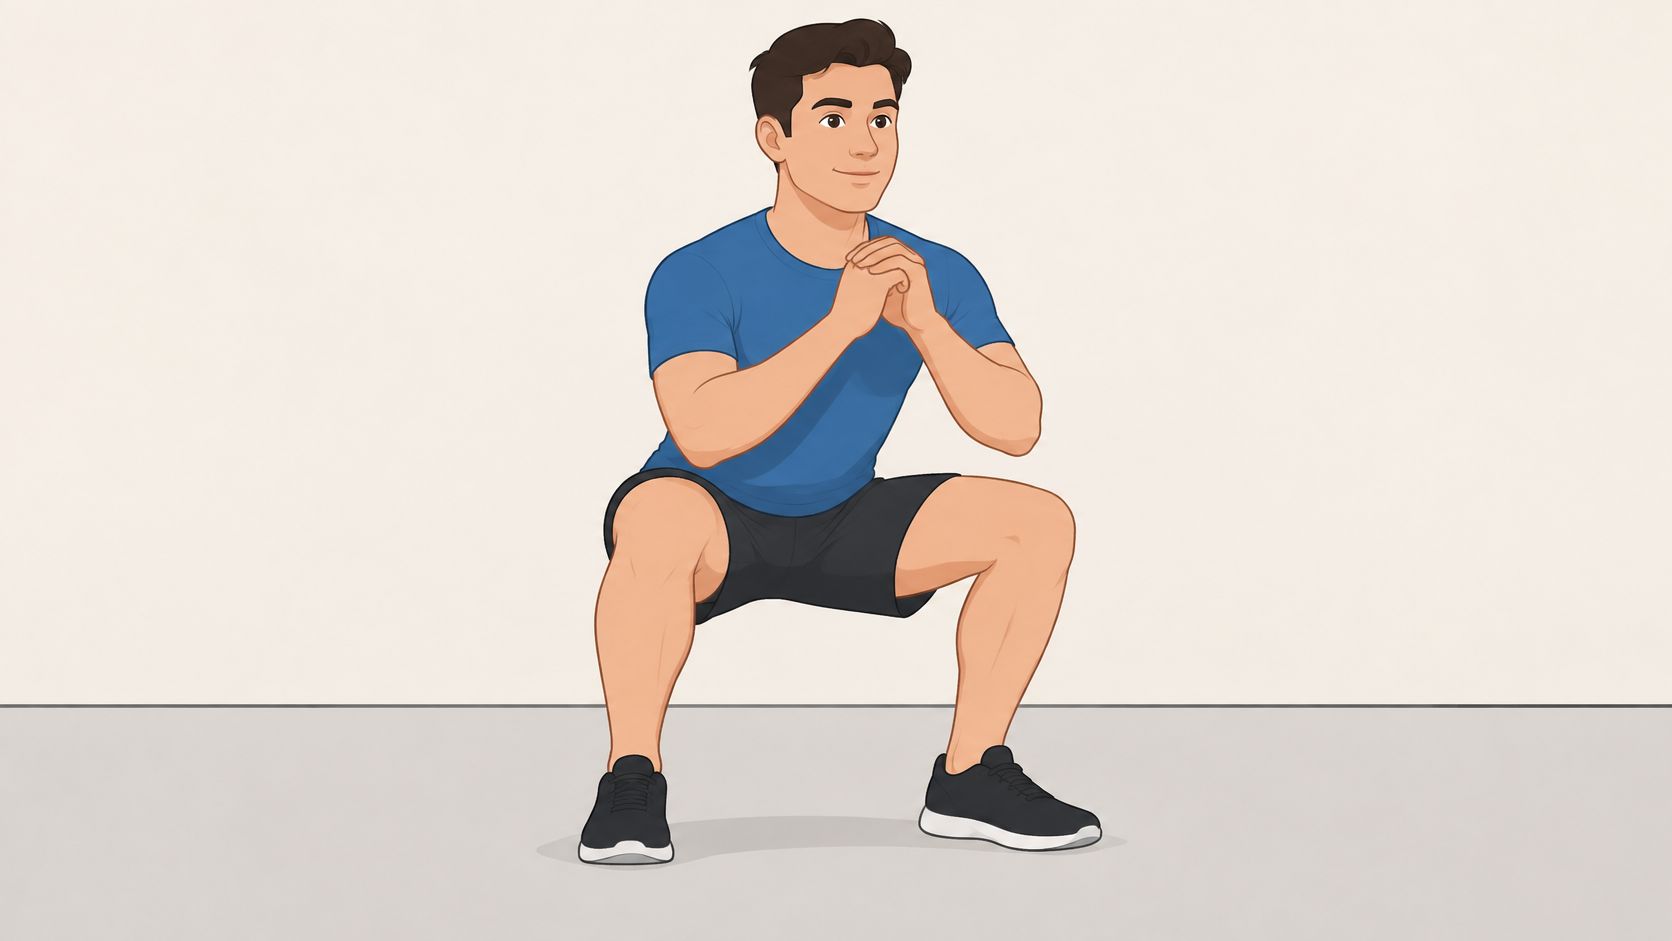
Stand with your feet around shoulder-width apart, adjusting the stance until it feels natural. Bend your knees and hips together, keeping your whole foot grounded, then stand by pushing the floor away.
Use a Chair as a Target
Start with a stable chair behind you if depth or balance feels uncertain. Sit down under control, then stand without throwing your chest forward. As control improves, lightly touch the seat rather than fully resting.
- Track your knees: Let them move in the same direction as your toes.
- Choose your depth: Descend only as far as you can maintain balance and a comfortable position.
- Add difficulty deliberately: Pause near the bottom or slow the lowering phase before chasing long sets.
Say you're waiting for a document to upload. Step away from the desk, perform a controlled squat set, and return to work without turning the break into a rushed circuit.
Don't confuse breathlessness with useful leg loading. If you can comfortably perform many repetitions, choose a slower or more demanding variation. Endless easy squats may take more time without providing the challenge you're looking for.
6. Glute Bridge
When standing exercises feel too demanding, the glute bridge offers a floor-based way to train hip extension. It emphasizes the glutes, with the hamstrings helping, while requiring less balance than a squat or lunge.
Lie on your back with your knees bent and feet flat. Keep your arms relaxed beside you, gently brace your abdomen, and lift your hips until your thighs and trunk form a comfortable line.
Lift With Your Hips, Not Your Lower Back
Press through your feet and squeeze your glutes at the top. Stop lifting before your ribs flare or your lower back arches, then lower slowly.
For an easy micro-set, keep a mat near your home workspace and do bridges after a standing task. A beginner can start with a small lift and gradually increase the range, while someone returning to exercise can focus on an even push through both feet.
Quality check: You should be able to finish the lift without throwing your ribs upward. More height isn't better if it comes from your lower back.
If your hamstrings cramp, stop, reset, and bring your feet slightly closer before trying a smaller movement. Persistent discomfort is a reason to change the exercise, not keep experimenting under fatigue.
Progress by adding a controlled pause or slowing the descent. Earn a steady bridge before attempting a single-leg version, which demands considerably more pelvic control.
7. Reverse Lunge
A reverse lunge gives each leg a more individual challenge than a squat. It trains your thighs and glutes while asking you to manage balance, but you can remove much of the balance demand with a hand on a counter.
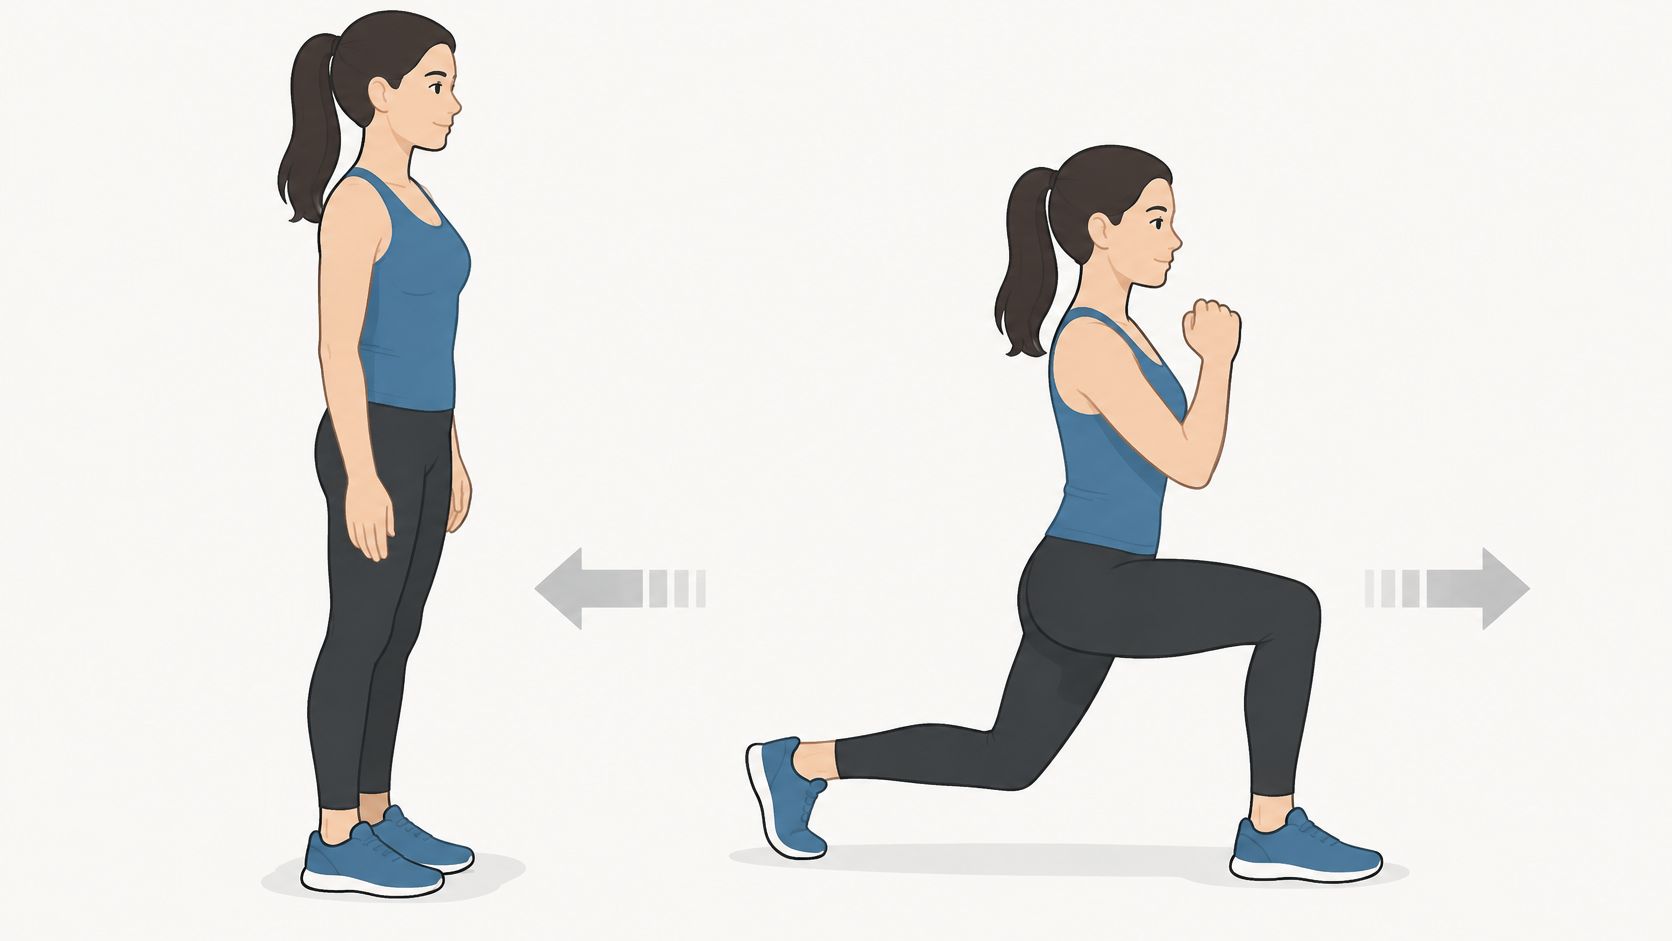
Stand tall, step backward, and bend both knees through a comfortable range. Keep your front foot planted and your front knee tracking with your toes, then push through that foot to return to standing.
Support Helps You Train the Leg
Using a counter isn't cheating. It lets you concentrate on loading the front leg instead of wobbling through every repetition.
- Start smaller: Take a modest step back and use a shallow bend.
- Simplify further: Keep your feet in a split stance and lower without repeatedly stepping.
- Progress with control: Increase comfortable depth before removing hand support.
For example, alternate legs during a short afternoon break, stopping when you can't return smoothly to your starting position. Give each side the same controlled effort rather than rushing the less coordinated side.
Reverse lunges may feel better than forward lunges for some people, but they're not automatically knee-friendly for everyone. If you want a different movement direction, alternating side lunges are another option to learn separately. Choose the variation your joints tolerate, not the one that looks hardest.
8. Bird Dog
The bird dog rewards restraint. Reaching higher or moving faster usually makes it harder to keep your trunk still, which is the main job of this exercise.
Start on your hands and knees, with your hands beneath your shoulders and knees beneath your hips. Gently brace your abdomen, extend an opposite arm and leg, and return without shifting your weight abruptly.
Reach Long Rather Than High
Think about sending your hand toward the wall ahead and your heel toward the wall behind. Keep your pelvis level and your lower back quiet, using a folded towel or mat if your knees need cushioning.
A beginner might perform bird dogs during a floor break after a spell at the laptop. Extend only a leg at first, then try an arm separately before combining the opposite limbs.
- Reduce the demand: Slide your toes along the floor instead of lifting the leg.
- Check your alignment: Stop the reach before your back arches or your hips rotate.
- Progress slowly: Add a comfortable pause while continuing to breathe.
Home training can be useful without producing dramatic physique changes. A systematic review of unsupervised home resistance training found improvements in lower-limb strength, muscle power, and balance, supporting a focus on practical capability rather than appearance alone.
Bird dogs are control practice, not a substitute for challenging leg or pulling work. Include them alongside those movements rather than expecting them to do every job.
9. Plank
A plank doesn't need to become a long endurance contest. The useful part is holding a braced position you can breathe in, not remaining on your elbows after your back starts sagging.
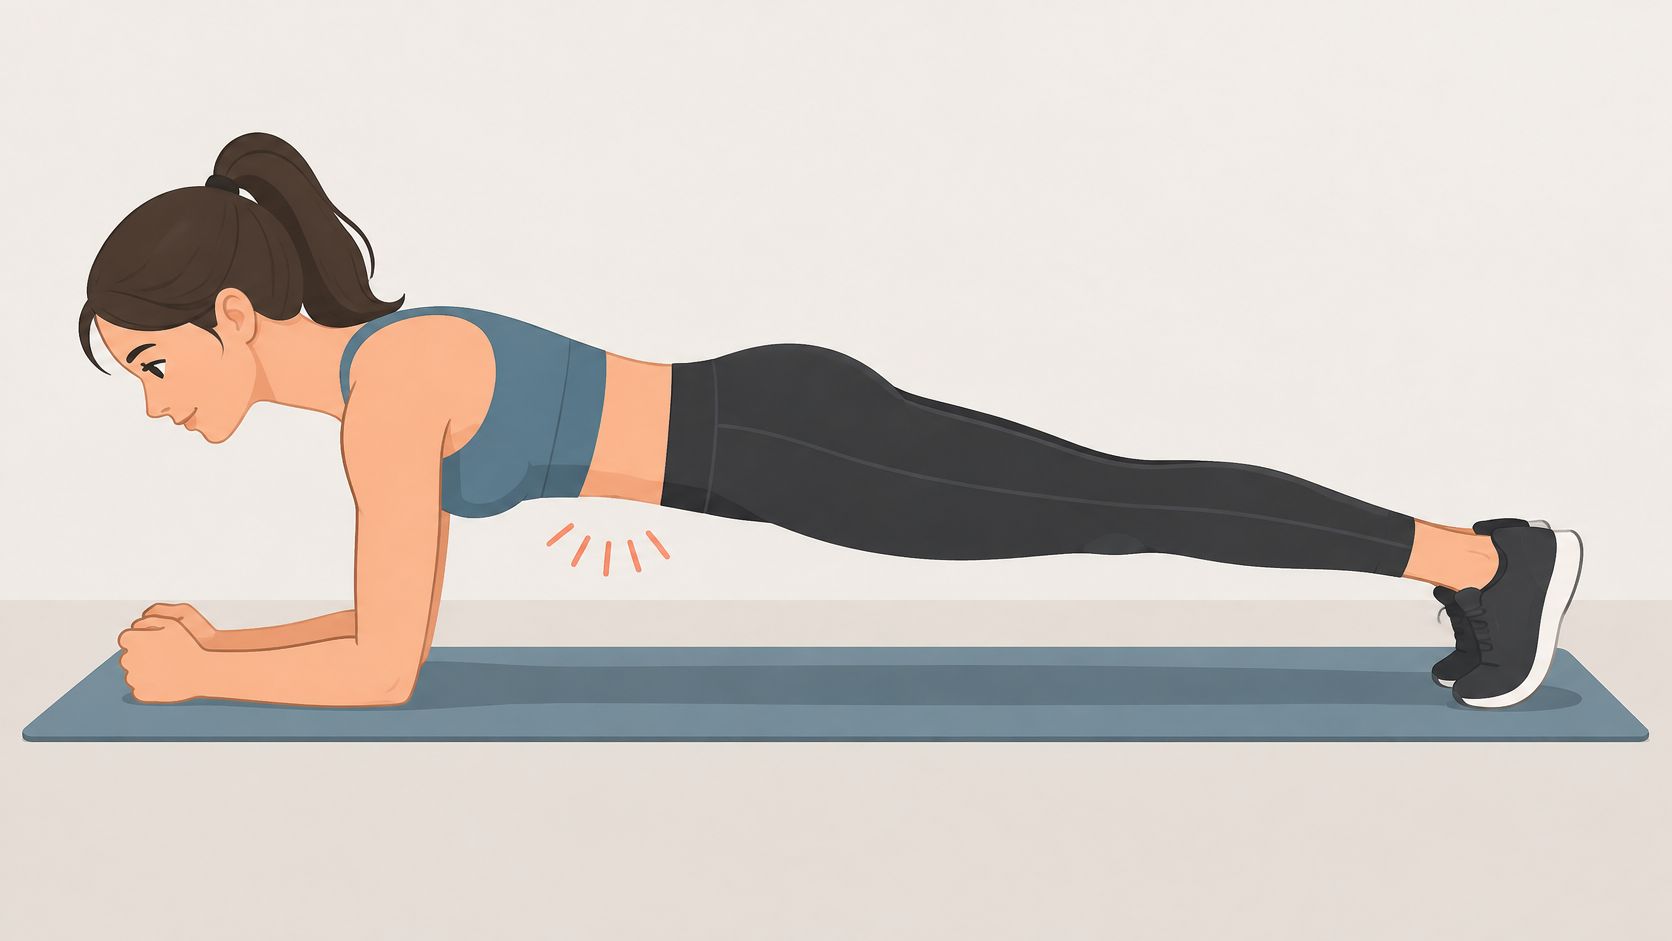
Place your elbows beneath your shoulders and extend your legs behind you. Gently tighten your glutes, bring your ribs toward your pelvis, and press your forearms into the floor.
End the Hold Before Your Shape Changes
Start with your knees down if the full version makes you hold your breath or strain your lower back. A modified plank against a fixed countertop is another useful regression.
- Watch your hips: Keep them from sinking or rising into a pronounced pike.
- Keep breathing: Use steady breaths instead of bracing so hard you can't exhale.
- Record the variation: A knee-supported hold and a full plank are different tasks.
For a between-tasks micro-set, finish a household chore, settle onto your mat, and hold only while your position remains controlled. Rest afterward rather than immediately repeating a shaky attempt.
Once an ordinary plank feels stable, plank shoulder touches offer a moving variation that requires additional control. There's no need to rush toward them.
Planks strengthen your trunk; they don't selectively remove belly fat. Use them to build bracing endurance, alongside full-body resistance exercise and broader activity.
10. Dead Bug
If planks mainly feel like a struggle in your shoulders or lower back, start with the dead bug. Lying on your back gives you a clear reference point for noticing when your trunk position changes.
Raise your arms toward the ceiling and bring your bent legs above your hips. Exhale gently, keep your lower back comfortably heavy against the floor, and slowly reach an opposite arm and leg away from your body.
Shorten the Reach to Keep Control
Return to the starting position before changing sides. Don't force your back flat with maximum effort; use enough abdominal tension to stop it arching as your limbs move.
A returning exerciser might use a short dead bug set before squats to practice breathing and bracing. Someone new to the movement can keep the arms still and lower a heel toward the floor instead.
- Regress the legs: Keep the knee bent and make the lowering movement smaller.
- Regress the arms: Leave them pointed upward until leg movement feels controlled.
- Progress the range: Reach farther only when your ribs and pelvis remain steady.
Stop the reach where you lose control, not where your heel reaches the floor.
Move deliberately enough that you can notice an arch developing and correct it. The floor is feedback, not a target you must reach with your limbs. A smaller controlled movement is more useful than a long reach followed by a lower-back arch, especially when you're fitting the set into an already busy day.
How the 10 bodyweight toning exercises compare at a glance
| Item | Main Muscles Worked | Equipment Needed | Easier Version | Best For |
|---|---|---|---|---|
| Push-Up | Chest, front shoulders, triceps, core | None | Wall or countertop push-up | At-home upper-body strength |
| Pull-Up | Lats, upper back, biceps, forearms | Secure overhead bar or support | Negative or band-assisted pull-up | Upper-body pulling and grip strength |
| Inverted Row | Upper back, rear shoulders, biceps | Sturdy table, bar, or suspension straps | More upright body angle | Beginner-friendly pulling strength |
| Chair Dip | Triceps, chest, front shoulders | Stable chair | Bent-knee chair dip | Triceps training at home |
| Bodyweight Squat | Quadriceps, glutes, hamstrings, core | None | Chair or box squat | Foundational lower-body strength |
| Glute Bridge | Glutes, hamstrings | Floor space; mat optional | Basic two-leg bridge | Low-impact hip strengthening |
| Reverse Lunge | Quadriceps, glutes, hamstrings | None; wall or chair for support if needed | Supported reverse lunge | Single-leg strength and balance |
| Bird Dog | Core, lower back, glutes, shoulders | None; mat or towel optional | Shorter, controlled reaches | Core stability and coordination |
| Plank | Abdominals, obliques, lower back, shoulders | None; mat optional | Knee plank | Core endurance |
| Dead Bug | Deep abdominals, trunk stabilizers | Floor space; mat optional | Shorter-range limb movement | Controlled core work |
Turning Ten Short Sets into a Toning Habit You Can Track
Pick four or five movements, rather than trying to perform the entire list whenever you have a break. Include a push, a pull with safe equipment, a squat or lunge, and a trunk exercise. Add a bridge if you want more hip work, or alternate it with your other lower-body movement.
Use three training days and four rest days as your starting rhythm. Monday, Wednesday, and Friday are a practical example, with the remaining days free from planned resistance sets. Rest days can still include comfortable walking and ordinary movement.
Spread the Work Across Familiar Tasks
- After breakfast: Perform your chosen push and leg exercise after an easy rehearsal of each movement.
- During a work break: Complete your pulling set when you can give the equipment setup proper attention.
- Later at home: Finish with your trunk exercise and, if selected, bridges.
Start with a small amount you can recover from. Each strengthening set should require effort, but you don't need to reach complete exhaustion, particularly while learning. Add repetitions or choose a harder variation only when the current work feels controlled and repeatable.
Short resistance sets cover only part of an active lifestyle. The World Health Organization's physical-activity guidance recommends that adults accumulate 150–300 minutes of moderate aerobic activity weekly, alongside muscle-strengthening work involving all major muscle groups on at least two days per week. Keep walking, cycling, or another suitable aerobic activity in your week rather than treating floor exercises as a complete replacement.
Track Comparable Effort
Our iPhone app, SuperStrong, logs each bodyweight set as a tile on a shared wall for up to four friends. Bigger tiles show more repetitions, and a NEW PR badge marks personal bests. Our plan uses a small goal on each training day, with the same training-and-rest rhythm described above.
Compare like with like. More repetitions can show progress within the same exercise variation, but a larger logged count doesn't automatically mean better technique or a harder set. Keep track of support height, assistance, and range when those change.
If you're older, have been inactive, or manage a medical condition, begin with supported versions and modest effort. Stop for pain, dizziness, or unusual symptoms, and seek appropriate advice. We provide a log, not a coach or medical advice, so check with a doctor before starting an exercise programme.
SuperStrong gives you a shared visual record of short bodyweight sets, so your home training doesn't disappear into a forgotten note. Visit SuperStrong to explore the iPhone app, invite your friends, and start recording a manageable training-day goal.